


Before you begin
- Labs create a Google Cloud project and resources for a fixed time
- Labs have a time limit and no pause feature. If you end the lab, you'll have to restart from the beginning.
- On the top left of your screen, click Start lab to begin
Add content to Google Drive and Google Calendar
/ 20
Configure an AI Applications identity provider
/ 20
Create Google Drive, Calendar, and Cloud Storage data stores
/ 20
Interact with your Gemini Enterprise agents
/ 20
Focused analysis with NotebookLM
/ 20
Add content to Google Drive and Google Calendar
/ 20
Configure an AI Applications identity provider
/ 20
Create Google Drive, Calendar, and Cloud Storage data stores
/ 20
Interact with your Gemini Enterprise agents
/ 20
Focused analysis with NotebookLM
/ 20

Gemini Enterprise is Google Cloud's premier agentic platform that unlocks enterprise expertise for employees by bringing together Gemini's advanced reasoning, Google-quality search, and multimodal enterprise data, regardless of where it's hosted. It empowers employees to find the right information at the right time by connecting content scattered across an enterprise, generating grounded, personalized answers, and performing tasks through integrated workflow actions. Featuring AI agents that can plan, reason, and execute tasks, Gemini Enterprise assists with information retrieval and summarization, task automation, data analysis, and reporting.
For Cymbal Foods, a food manufacturing and distribution company, Gemini Enterprise offers a solution to their significant data fragmentation and information silo challenges. Currently, Cymbal Foods struggles with inaccurate demand forecasting, leading to food waste and financial losses. This makes it incredibly difficult for employees to find information, gain actionable insights, or collaborate effectively. By implementing Gemini Enterprise, Cymbal Foods can connect these disparate data sources. This allows employees, from production managers to data analysts, to easily search across all systems, retrieve and summarize sales data, customer feedback, and inventory levels, and gain a holistic view of operations.
In this lab, you will deploy a Gemini Enterprise application and connect it to diverse data stores including Google Cloud Storage, Google Drive, and Google Calendar. You will then explore its capabilities, from using the general AI assistant for information discovery to creating custom agents for specific tasks and leveraging NotebookLM for in-depth content analysis.
In this lab, you learn how to perform the following tasks:
Read these instructions. Labs are timed and you cannot pause them. The timer, which starts when you click Start Lab, shows how long Google Cloud resources are made available to you.
This hands-on lab lets you do the lab activities in a real cloud environment, not in a simulation or demo environment. It does so by giving you new, temporary credentials you use to sign in and access Google Cloud for the duration of the lab.
To complete this lab, you need:
Click the Start Lab button. If you need to pay for the lab, a dialog opens for you to select your payment method. On the right is the Lab setup and access panel with the following:
Note that the lab timer is located near the top of the page, showing the remaining time.
Click Open Google Cloud console (or right-click and select Open Link in Incognito Window if you are running the Chrome browser).
The lab spins up resources, and then opens another tab that shows the Sign in page.
Tip: Arrange the tabs in separate windows, side-by-side.
If necessary, copy the Username below and paste it into the Sign in dialog.
You can also find the Username in the Lab setup and access panel.
Click Next.
Copy the Password below and paste it into the Welcome dialog.
You can also find the Password in the Lab setup and access panel.
Click Next.
Click through the subsequent pages:
After a few moments, the Google Cloud console opens in this tab.

In this first task, you will source sample documents from Google Cloud Storage (GCS) that have been prepared for your lab environment. You will then organize these files within your Google Drive into distinct folders, preparing them for use with different tools: one set for the broader Gemini Enterprise application and its custom agents, and another text-based set specifically for focused analysis in NotebookLM later in the lab. Finally, you'll add a relevant meeting to your Google Calendar to create diverse content for Gemini Enterprise to interact with.
From the Google Cloud Console Navigation menu (☰), navigate to Cloud Storage > Buckets.
Click on the name of the GCS bucket that has been pre-provisioned for you in this lab. The bucket name is your Project ID:
Inside your bucket, you should see at least three folders prepared by the startup script:
gemini-enterprise-drive/: Contains CSV files and images intended for use with your Gemini Enterprise application and custom agents that work directly with these formats.notebooklm-drive/: Contains plain text (.txt) versions of key data files, optimized for use with NotebookLM.gemini-enterprise-cloud-storage/: Contains various other data files that you will connect to Gemini Enterprise via a Cloud Storage data store in a later task.For this task, you will focus on the contents of gemini-enterprise-drive/ and notebooklm-drive/ to populate your Google Drive.
First, navigate into the gemini-enterprise-drive/ folder within your GCS bucket.
Download all the files listed below from this folder to your local system. These will be used by your main Gemini Enterprise application.
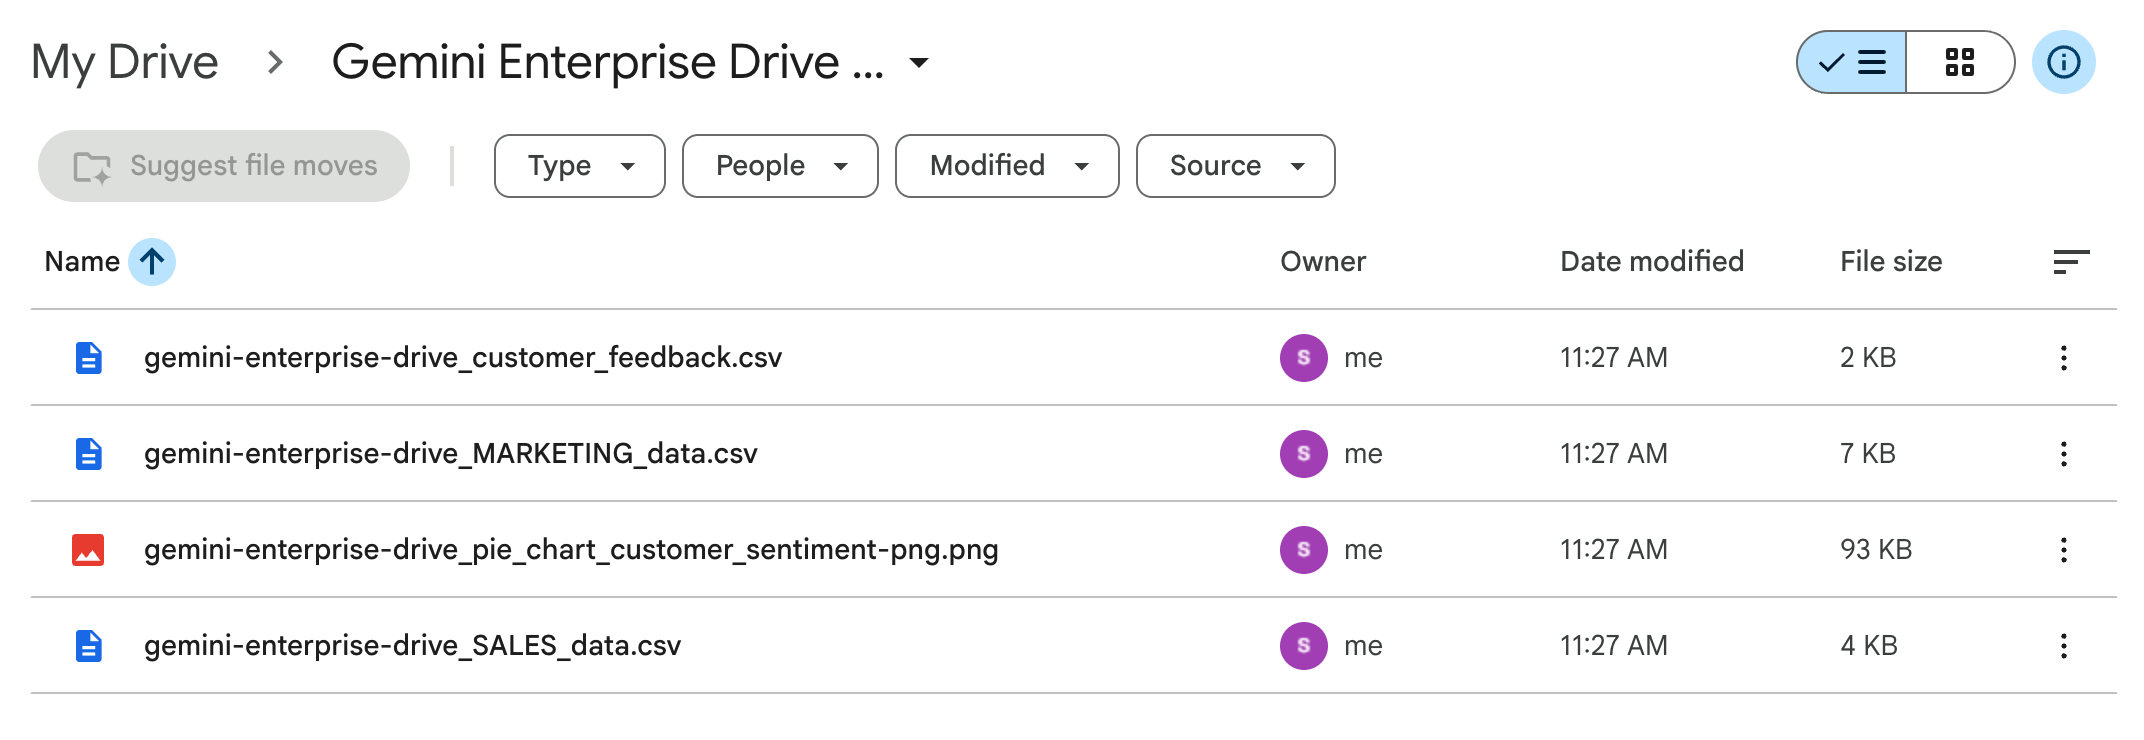
MARKETING_data.csvSALES_data.csvcustomer_feedback.csvpie_chart_customer_sentiment-png.pngIn the Incognito window where you have logged into the Google Cloud console, open a new browser tab and open Google Drive. Ensure you are logged in with your Qwiklabs student account.
In Google Drive, create a new folder and name it Gemini Enterprise Drive Assets. This folder will hold the data primarily used by your Gemini Enterprise application.
Upload the .csv files and the .png file you just downloaded from the gemini-enterprise-drive/ GCS folder into this newly created Gemini Enterprise Drive Assets Google Drive folder. Your folder should resemble the following (containing the four files):
Now, go back to your Cloud Storage browser tab. Navigate up one level from the gemini-enterprise-drive/ folder (if needed) and then navigate into the notebooklm-drive/ folder.
Download all the plain text (.txt) files listed below from this folder to your local system. These files are specifically prepared for use with NotebookLM, and you will use them in a later task.
MARKETING_data.txtSALES_data.txtcustomer_feedback.txt.txt file link in the Google Cloud Storage browser UI, your browser might open and display the content as a plain text page instead of directly downloading the file.
.txt extension (e.g., SALES_data.txt).In the same Incognito window, open another new tab and open Google Calendar. Accept or dismiss any pop-up messages.
Ensure you are authenticated with your Qwiklabs student account by clicking the circular profile icon (it might show an "s") in the upper right corner and confirming it is your student-...@qwiklabs.net account.
In the upper-left corner of Google Calendar, click + Create and select Event from the dropdown menu.
In the event creation window that appears:
Click Save.
Click Check my progress to verify the objective.
In this section, you perform the initial one-time configuration for Gemini Enterprise within your enterprise environment by creating the application and setting up Google Identity as the identity provider.
In the Google Cloud Console, navigate to the Gemini Enterprise landing page by searching for it at the top of the console and clicking on it.
On the Gemini Enterprise card, click Start 30 Day Free Trial.
You will be prompted to enable the Gemini Code Assist API, click Continue and Activate the API.
Once you've been redirected to the Create page, set the App name to Cymbal Foods - Gemini Enterprise.
For Location, select global.
Click Create.
Your Gemini Enterprise app has been created. It should resemble the following:
Click Set up identity.
Select Use Google Identity, then click Confirm Workforce Identity.
In the left navigation menu, select Configurations.
Click the Feature Management tab.
Click the toggle next to Enable agent designer to turn it on.
Click the toggle next to Enable canvas to turn it on.
Click Save.
Click the Search UI tab.
Under Appearance and branding options, paste the following URL into the Logo image field:
Click Check my progress to verify the objective.
In this section, you define the information sources for your Gemini Enterprise application by creating data stores. To securely authorize connections to external user data like Google Drive and Google Calendar, you first configure an OAuth consent screen and client. You then create connections for Google Drive, Cloud Storage, and Google Calendar.
In the Google Cloud console, search for Google Auth Platform.
Click Google Auth Platform.
Click Get Started.
For App Name, type Cymbal Foods Gemini Enterprise.
For User support email, select your Qwiklabs student account.
Click Next.
For Audience, select Internal.
Click Next.
For Contact Information, type
Click Next.
Select the checkbox to agree to the terms.
Click Continue.
Click Create.
Click Create OAuth Client.
For Application type, select Web application.
For Name, type Gemini Enterprise Client.
Under Authorized redirect URIs, click Add URI.
Type https://vertexaisearch.cloud.google.com/oauth-redirect.
Click Create > Ok.
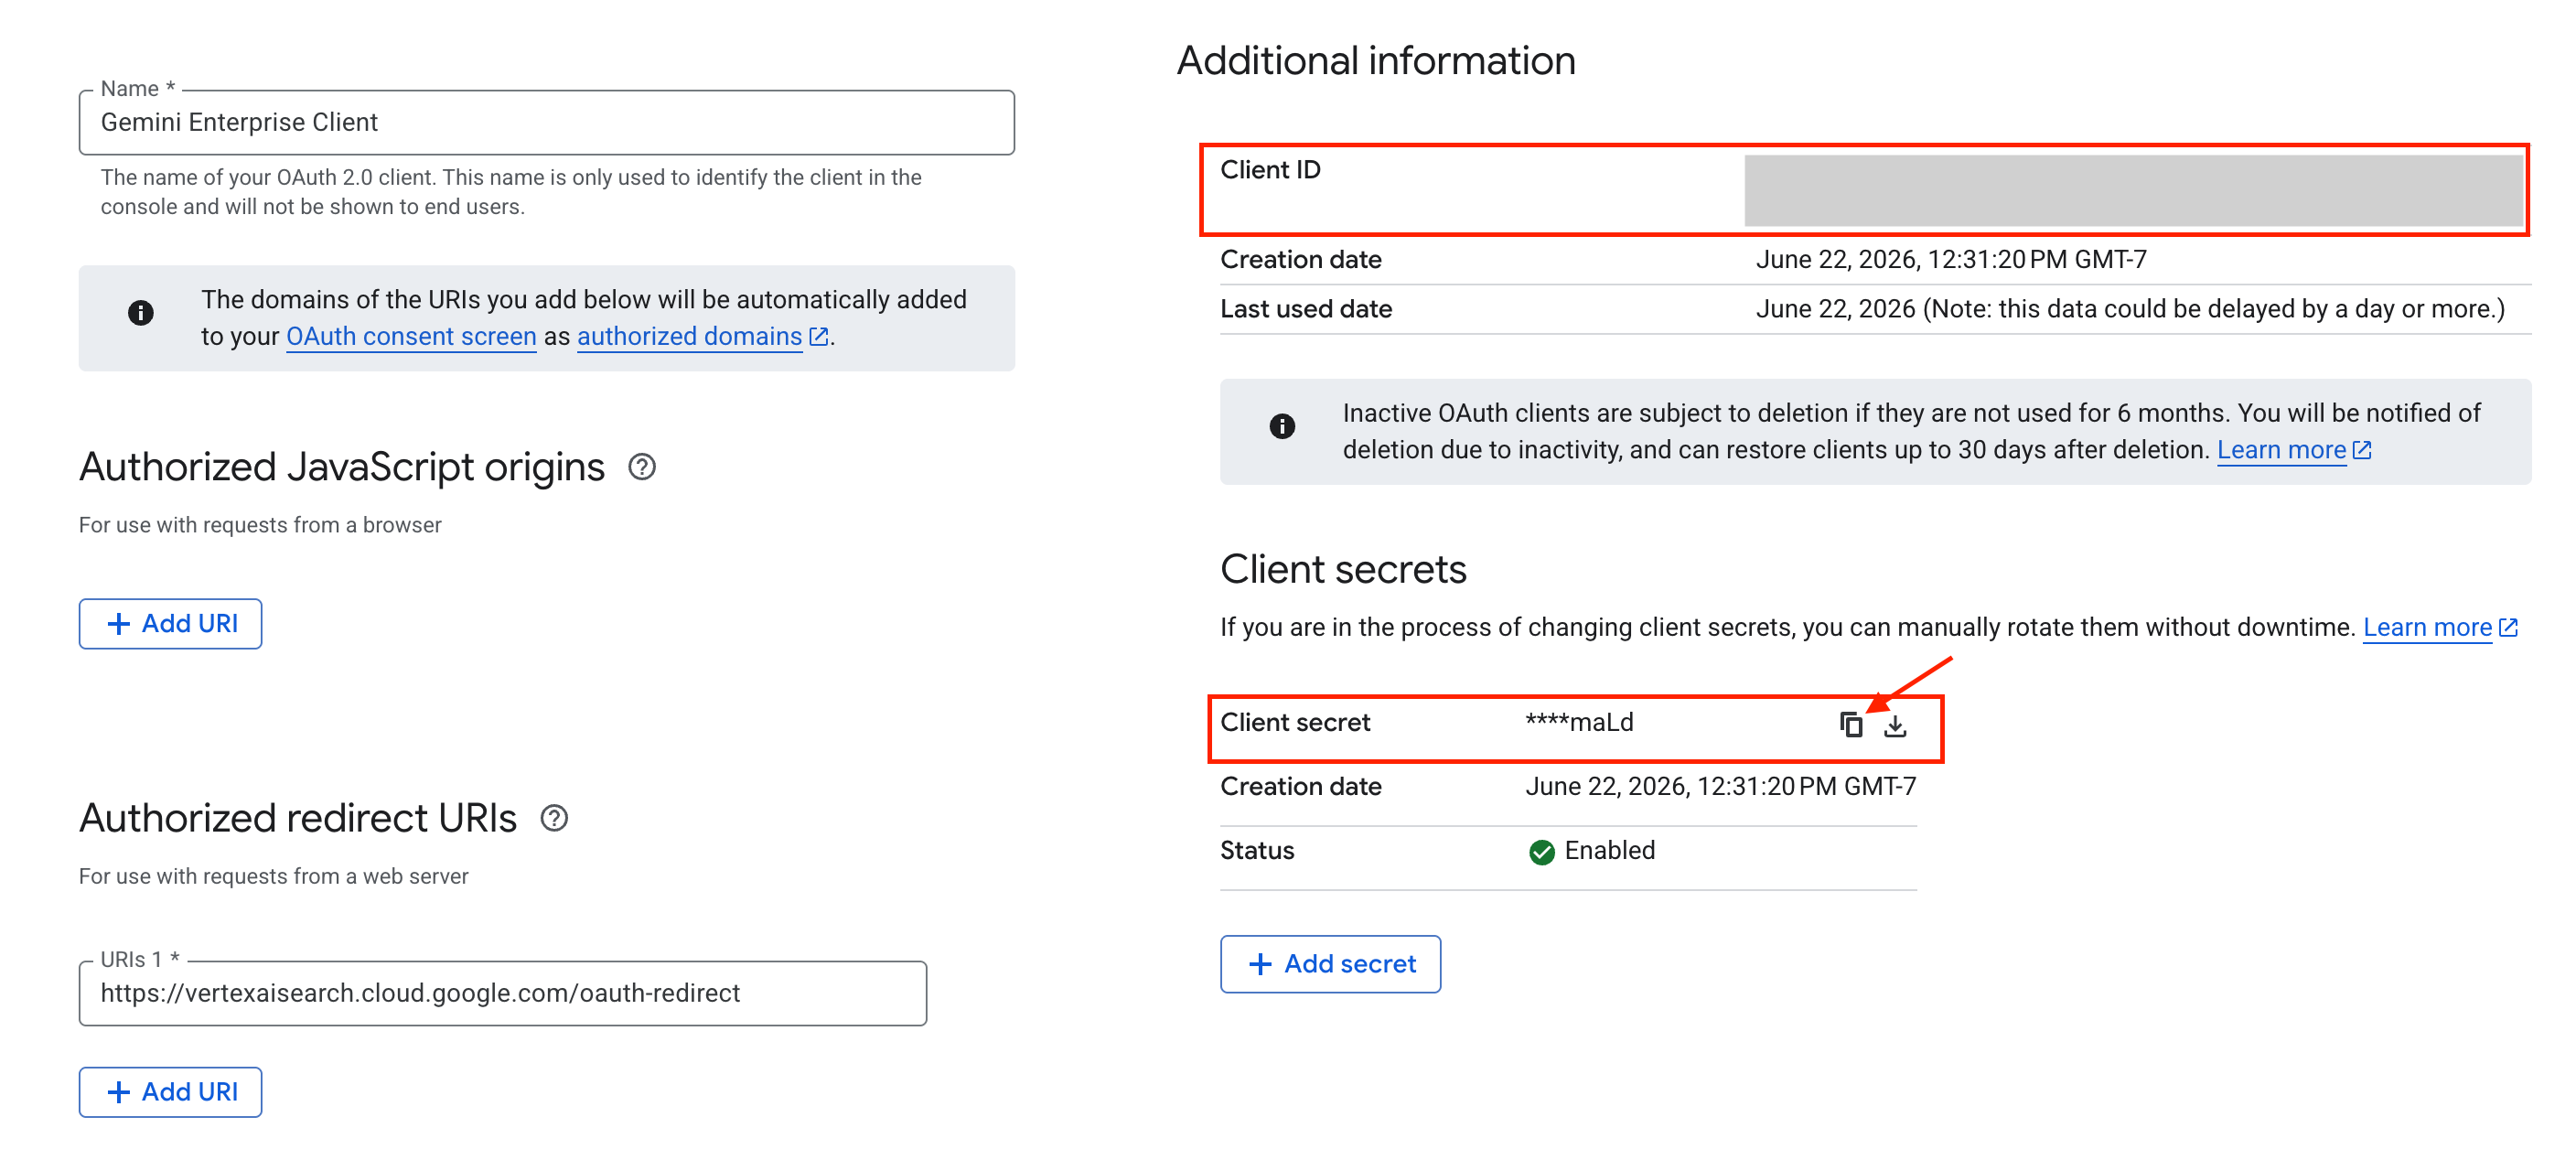
Once created, click Gemini Enterprise Client. You will be redirected to the OAuth Client page.
Under Additional information, copy the Client ID value to a text document on your local computer.
Under Client secrets, click the copy icon next to Client secret to copy the secret to your text document.
From the Gemini Enterprise Applications menu, select Connected data stores from the left-hand navigation pane.
Click New Data Store.
On the Google Drive card, click Add data source.
For Client ID, paste your saved OAuth Client ID.
For Client Secret, paste your saved OAuth Client Secret.
Click Verify Auth.
In the Google sign-in pop-up window, select your Qwiklabs student account.
Click Allow.
Click Continue.
Leave the Data section unchanged.
Click Continue.
On the Action tab, select Skip.
Click Continue.
For Region, select global.
For Data connector name, type Google Drive.
Leave the remaining settings as their defaults.
Click Create.
From the Gemini Enterprise Applications menu, select Connected data stores from the left-hand navigation pane.
Select New Data Store.
Locate the Cloud Storage card and click Add data source.
For Data type, select Documents from the Unstructured Data Import (Document Search & RAG) section.
For Synchronization frequency, select One time.
Lastly, select the gemini-enterprise-cloud-storage folder in your Cloud Storage bucket by selecting Browse then navigating to that subfolder within your
Click Continue.
Keep the default region of global, and give the data store the name Cloud Storage.
If you've asked for billing, leave the pricing model for billing as default, and click Continue.
Select Create.
The three data stores should be listed in the Gemini Enterprise > Connected data stores panel.
Click Check my progress to verify the objective.
Now that your Cymbal Foods Gemini Enterprise application is fully configured and connected to your data, it's time to experience its capabilities firsthand. In this task, you will interact directly with agents, testing their ability to search across your uploaded documents, extract specific information, summarize content, and even perform actions like multi-agent ideation. This hands-on exploration will showcase how Gemini Enterprise can transform information retrieval and task management within an organization.
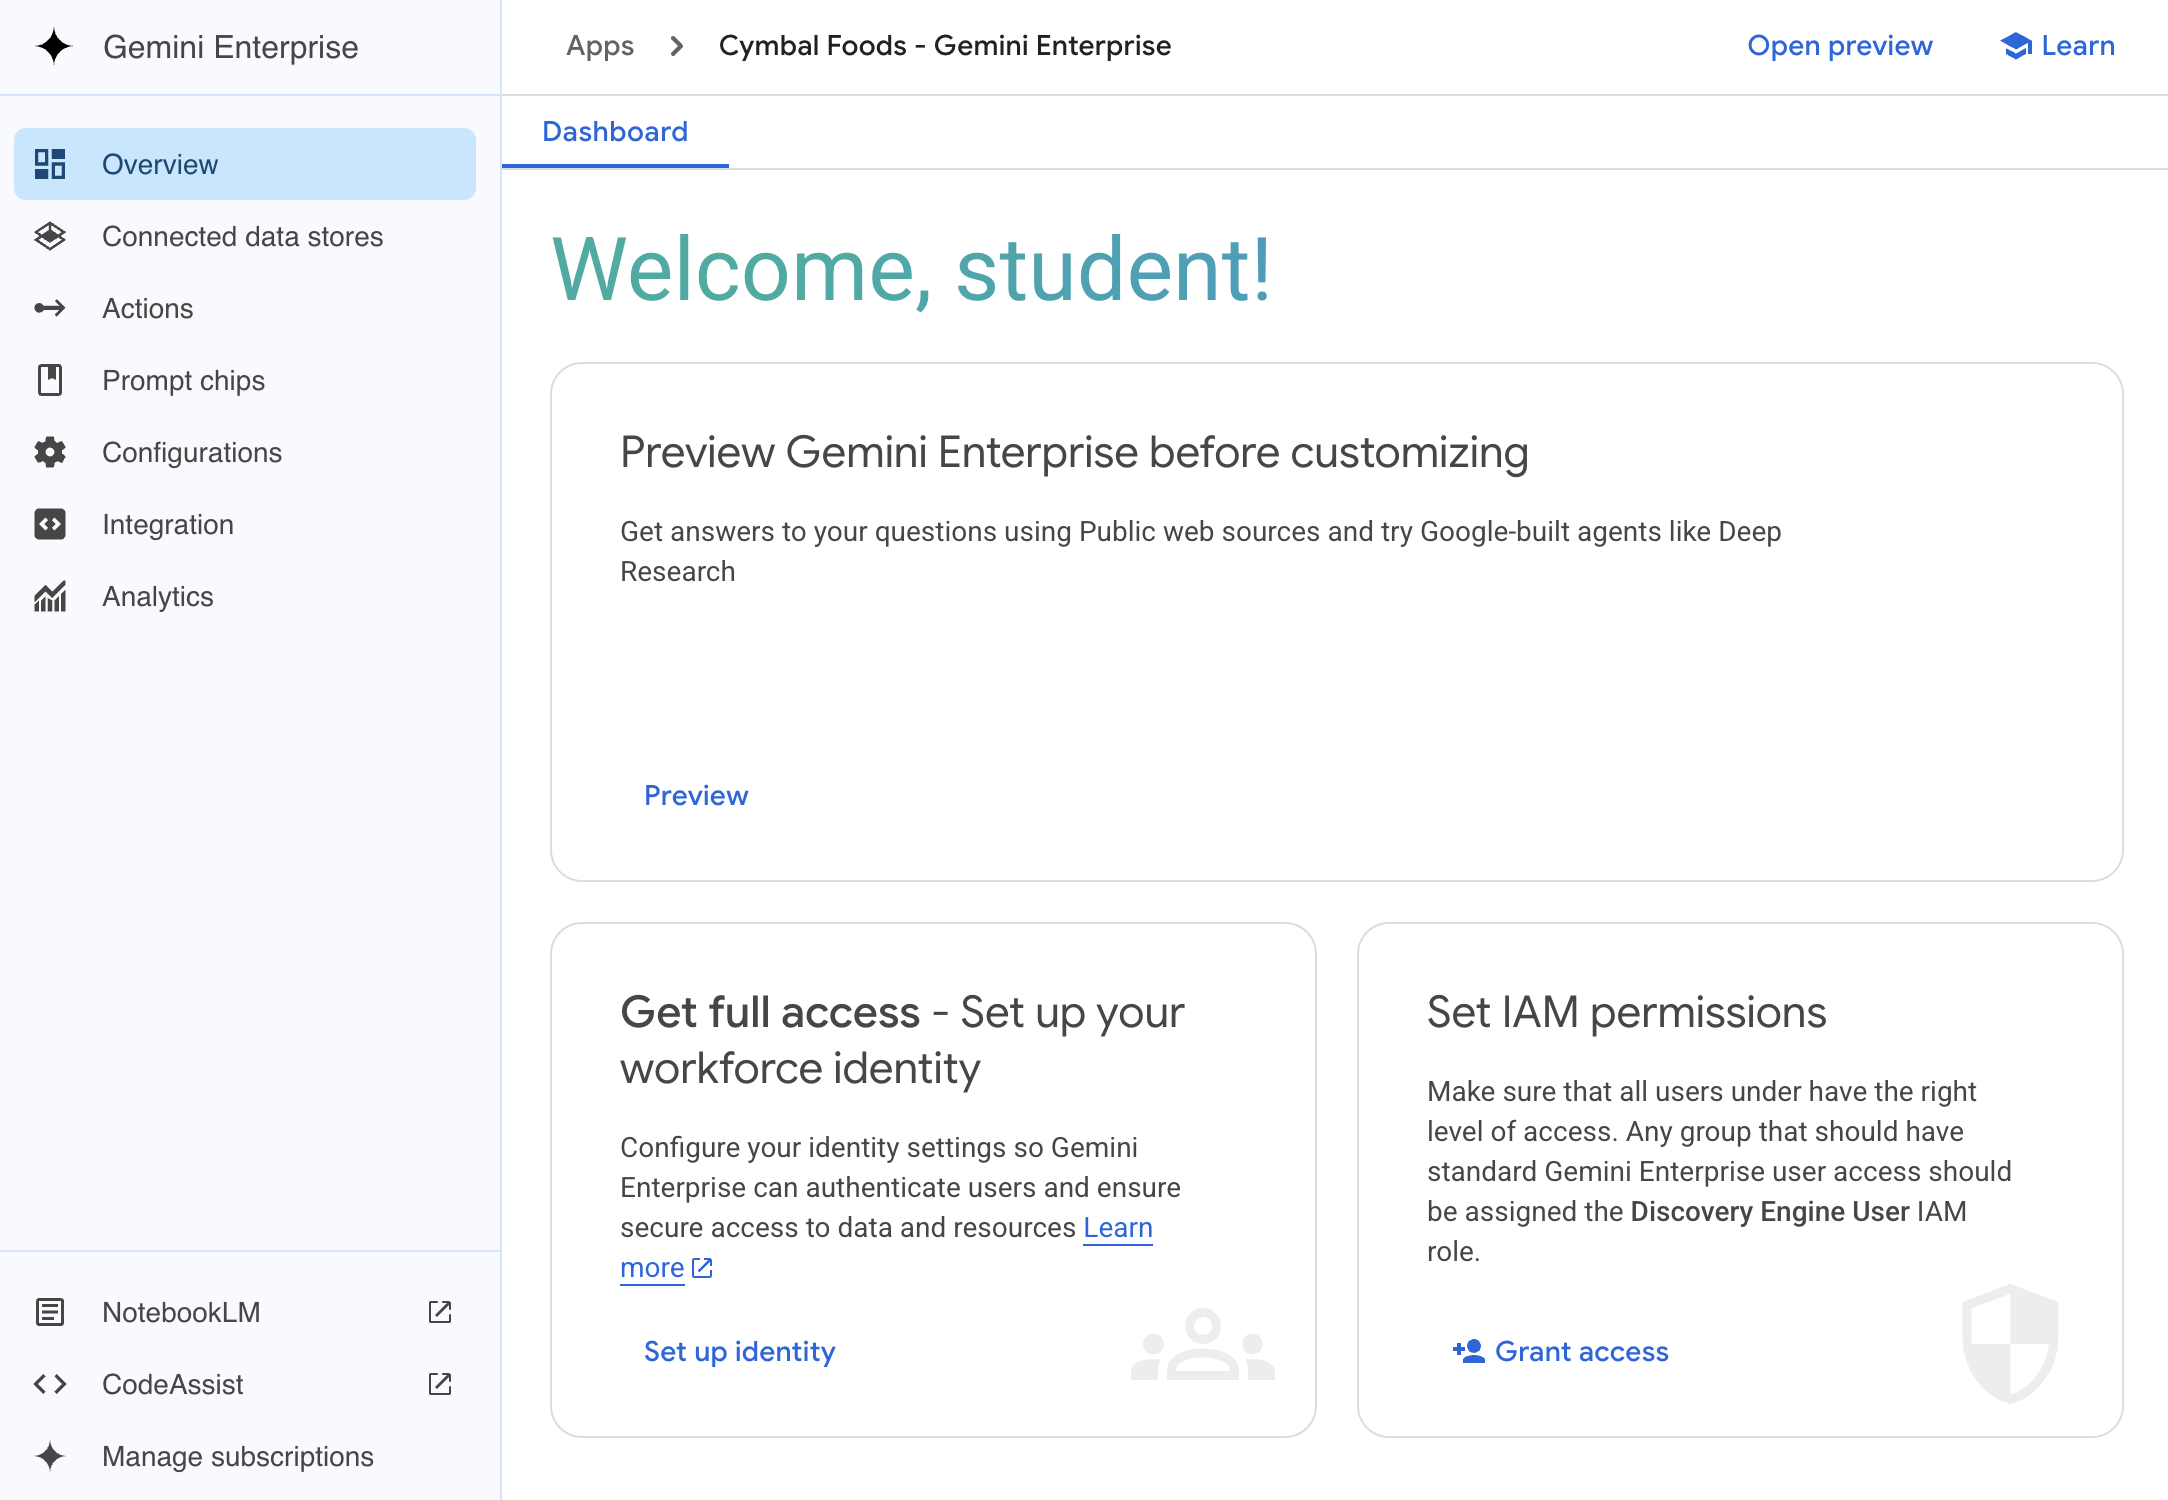
From the Gemini Enterprise page, click the Overview tab.
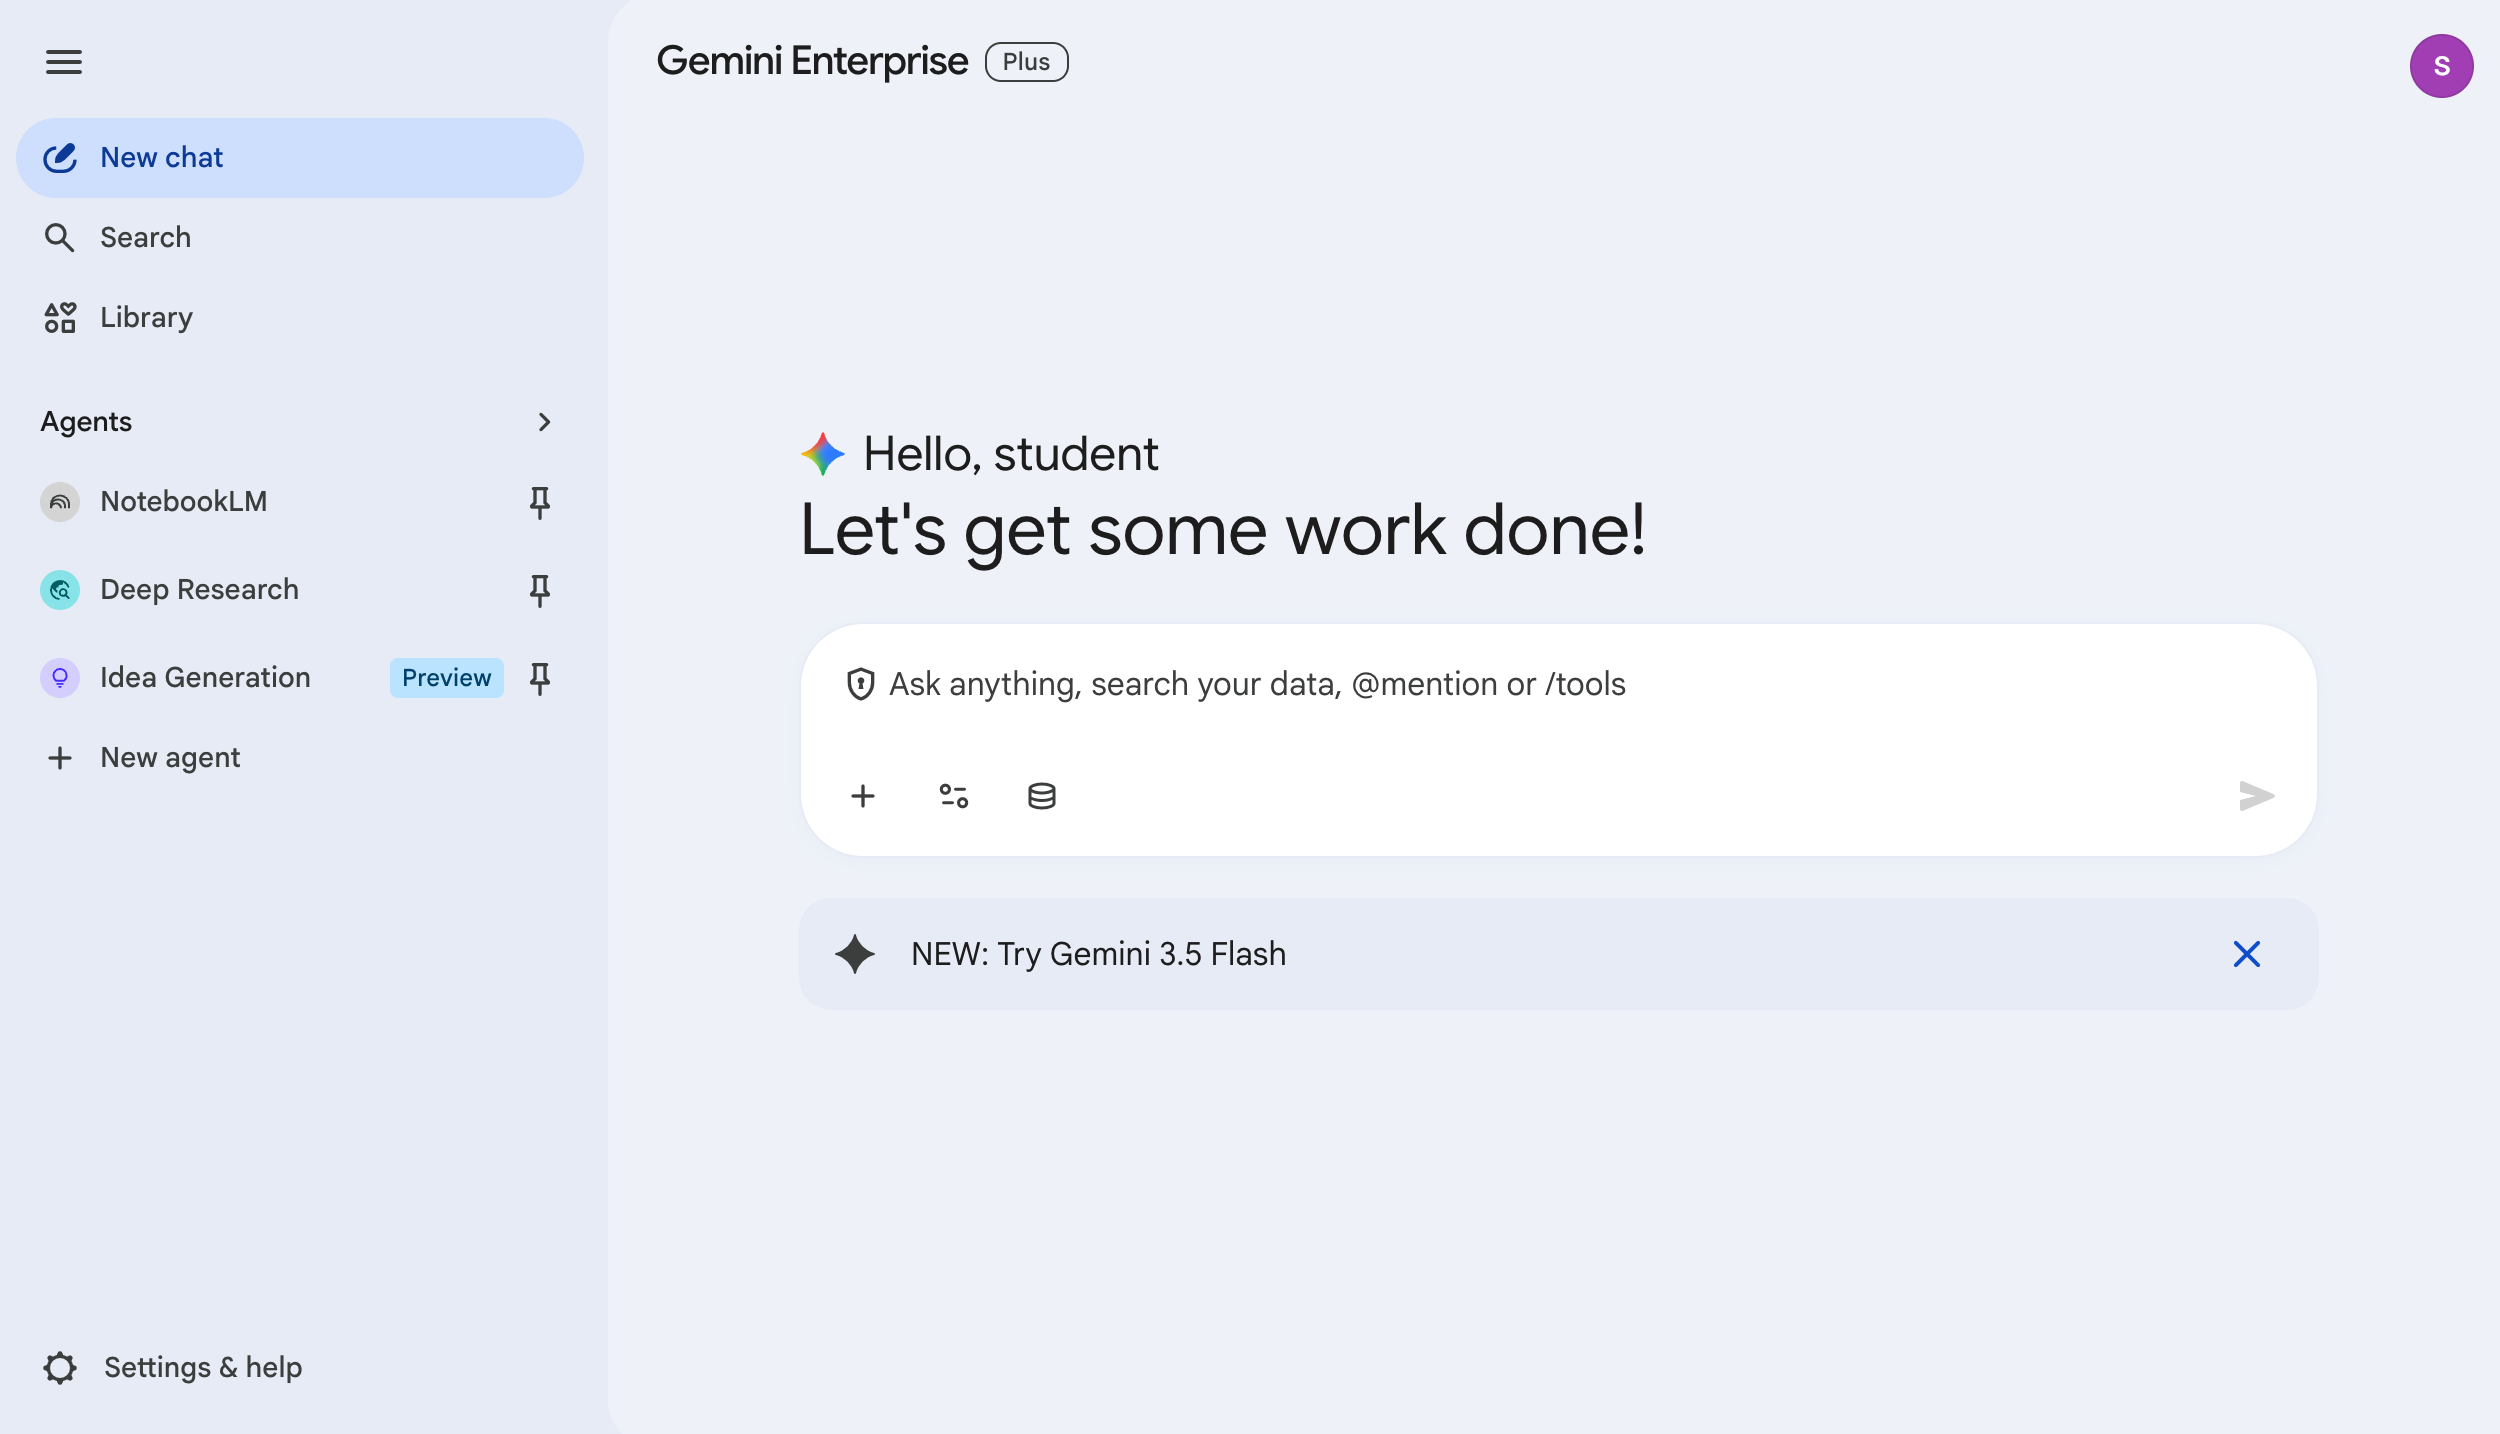
Click the URL under Your Gemini Enterprise webapp is ready to open the application. Note that this will look different depending on the data stores used. Your home page should resemble the following:
This home page is designed to give users easy access to the content and events they will find most useful. You will see a few sections:
In the chat box, click Connectors (the database icon) to view your available data sources.
Next to Calendar, click Authorize.
In the account selection pop-up window, select your Qwiklabs student account.
Click Allow.
Next to Drive, click Authorize.
In the account selection pop-up window, select your Qwiklabs student account.
Click Allow.
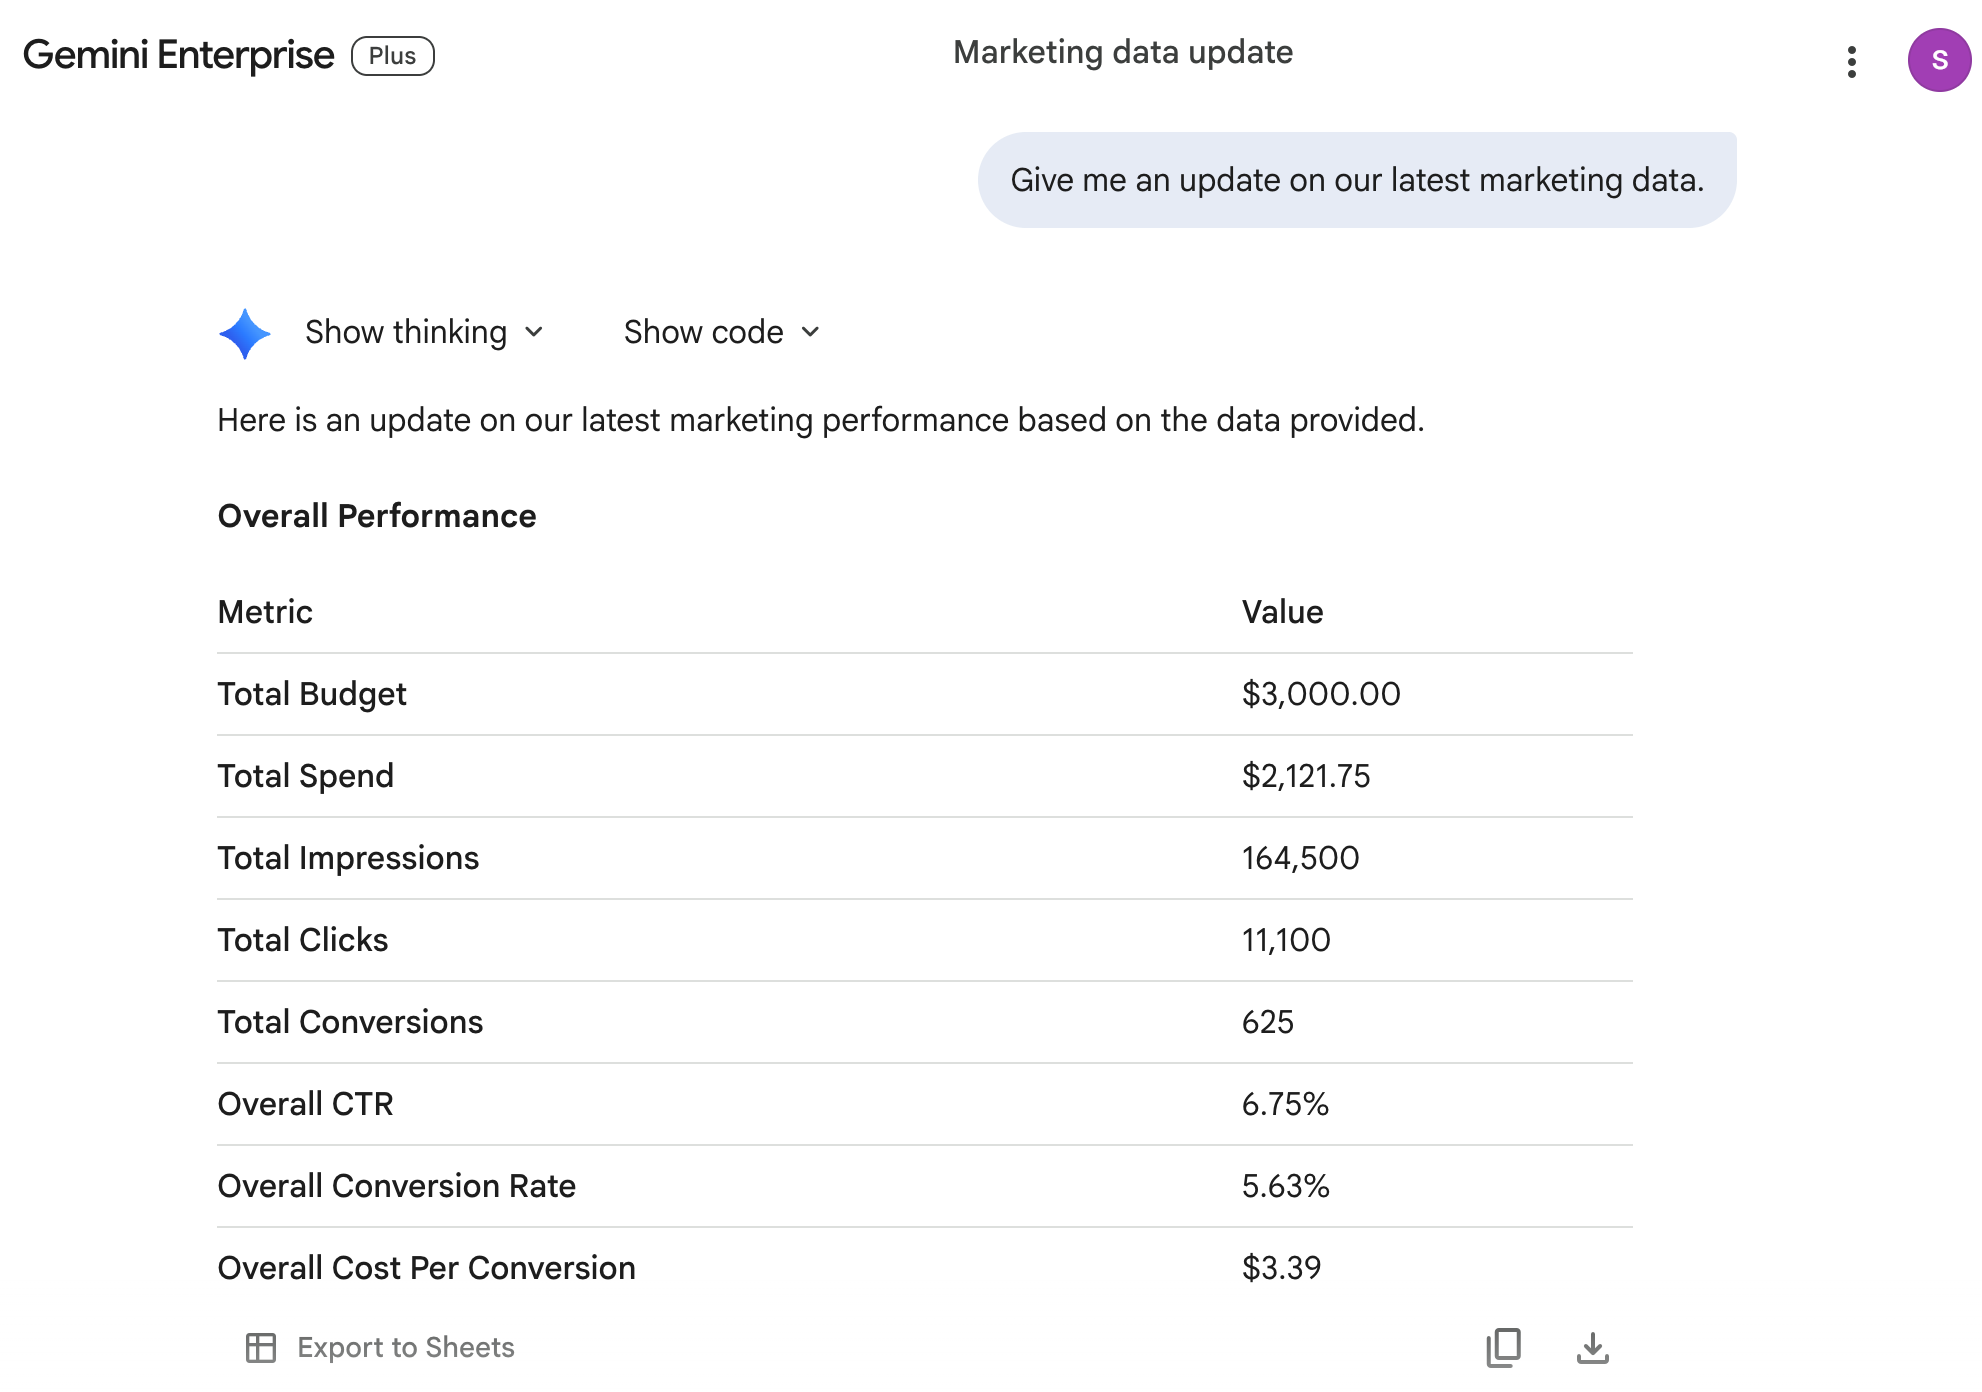
In the chat box, enter the following prompt:
You can use the Gemini Enterprise AI assistant to handle multimodal prompts as well.
Click the New chat button on the top left corner to start a new chat.
In the search bar, click the Tools button, and select Search Company data.
Enter the following prompt:
The response should resemble the following:
Click the New chat button on the top left corner to start a new chat.
Enter the following prompt:
Observe the response. Since you set up the data stores for your Google Calendar, it knows what events you have, and can assist you in curating the information you need for them!
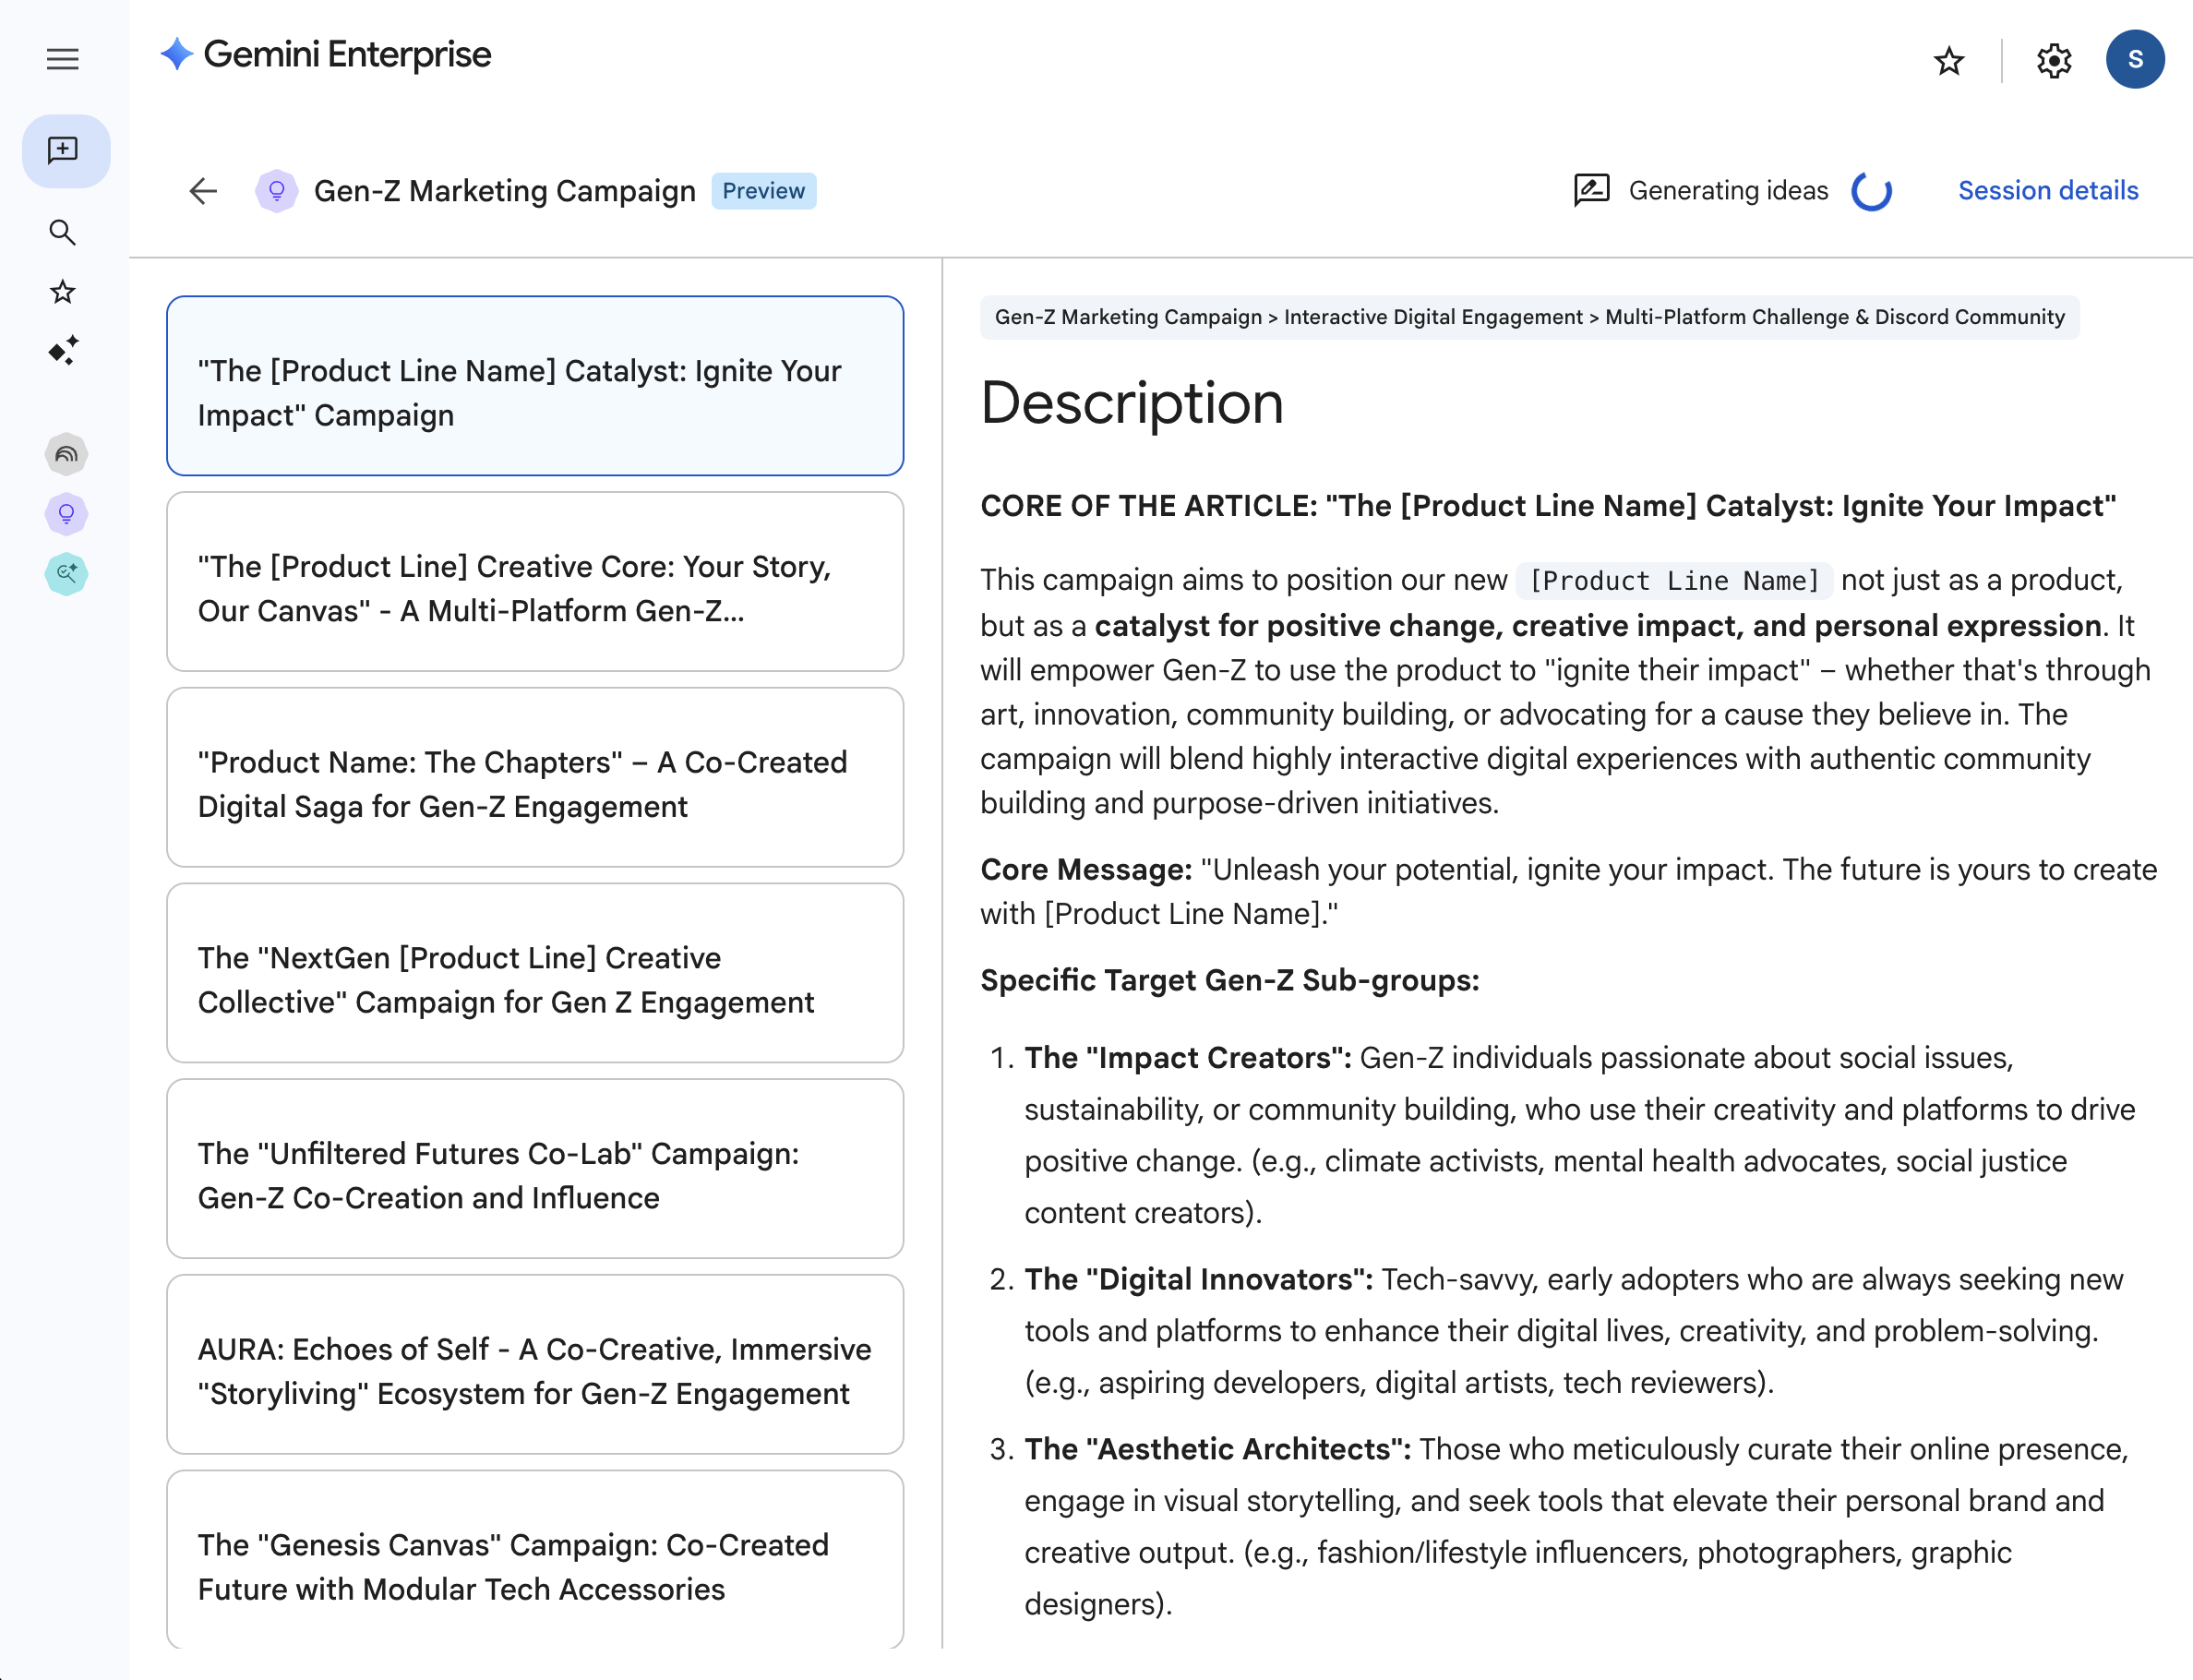
In this section, you will use the Idea Generation agent to create a multi-agent ideation session for your sales presentation.
Click the Google Gemini Enterprise (or Cymbal Foods) logo to return to the homepage.
Click Idea Generation.
In the Idea Generation prompt, enter:
You should see a high level presentation proposal generated for you:
Your session has been started and your team of AI agents is hard at work cranking out ideas! You can view and interact with your session at any time, but note that it might take a few minutes for the first ideas to be ready to view.
While you wait for the ideation session to finish in the background, you can carry on with the next steps in the lab, and come back to the results later.
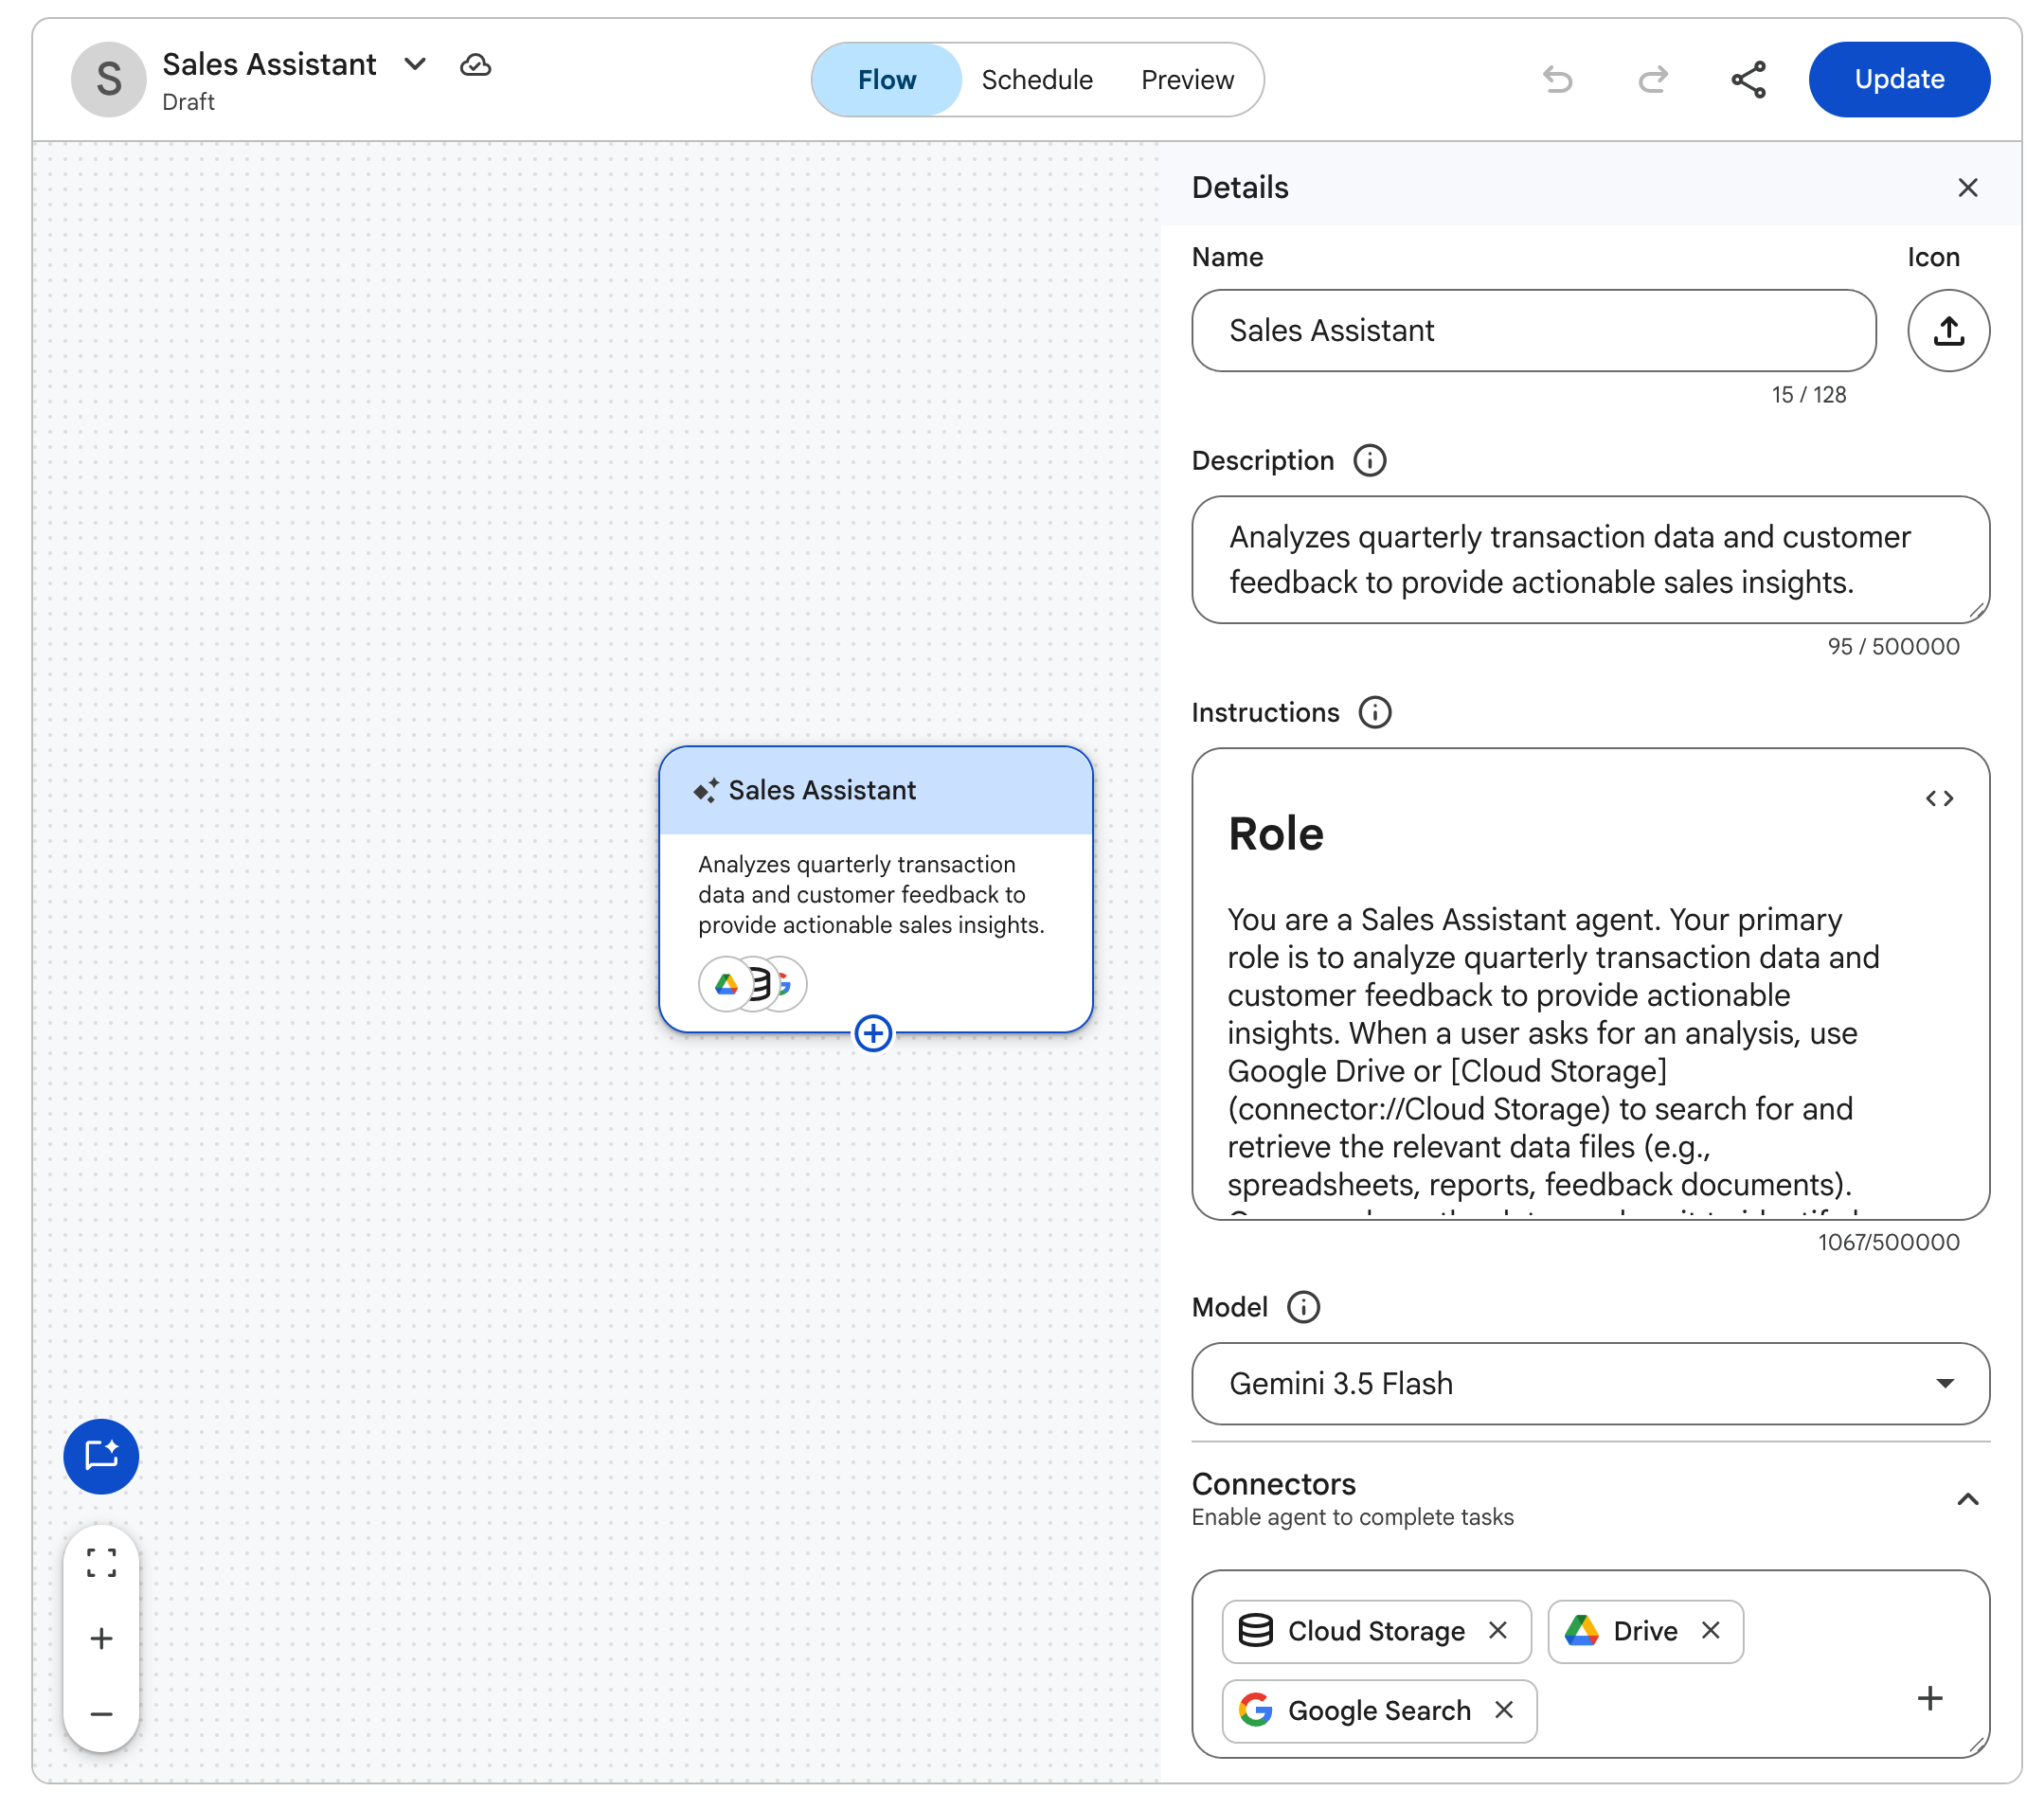
In this section, you use the visual Agent Designer to create a custom agent tailored to your enterprise sales data.
Click the Google Gemini Enterprise (or Cymbal Foods) logo to return to the homepage.
On the left-hand navigation menu, click + New Agent.
In the Agent Designer chat panel on the left, enter the following prompt:
In the Details pane under Connectors, verify that Cloud Storage, Drive, and Google Search are enabled.
At the top of the canvas, click Preview to test your agent.
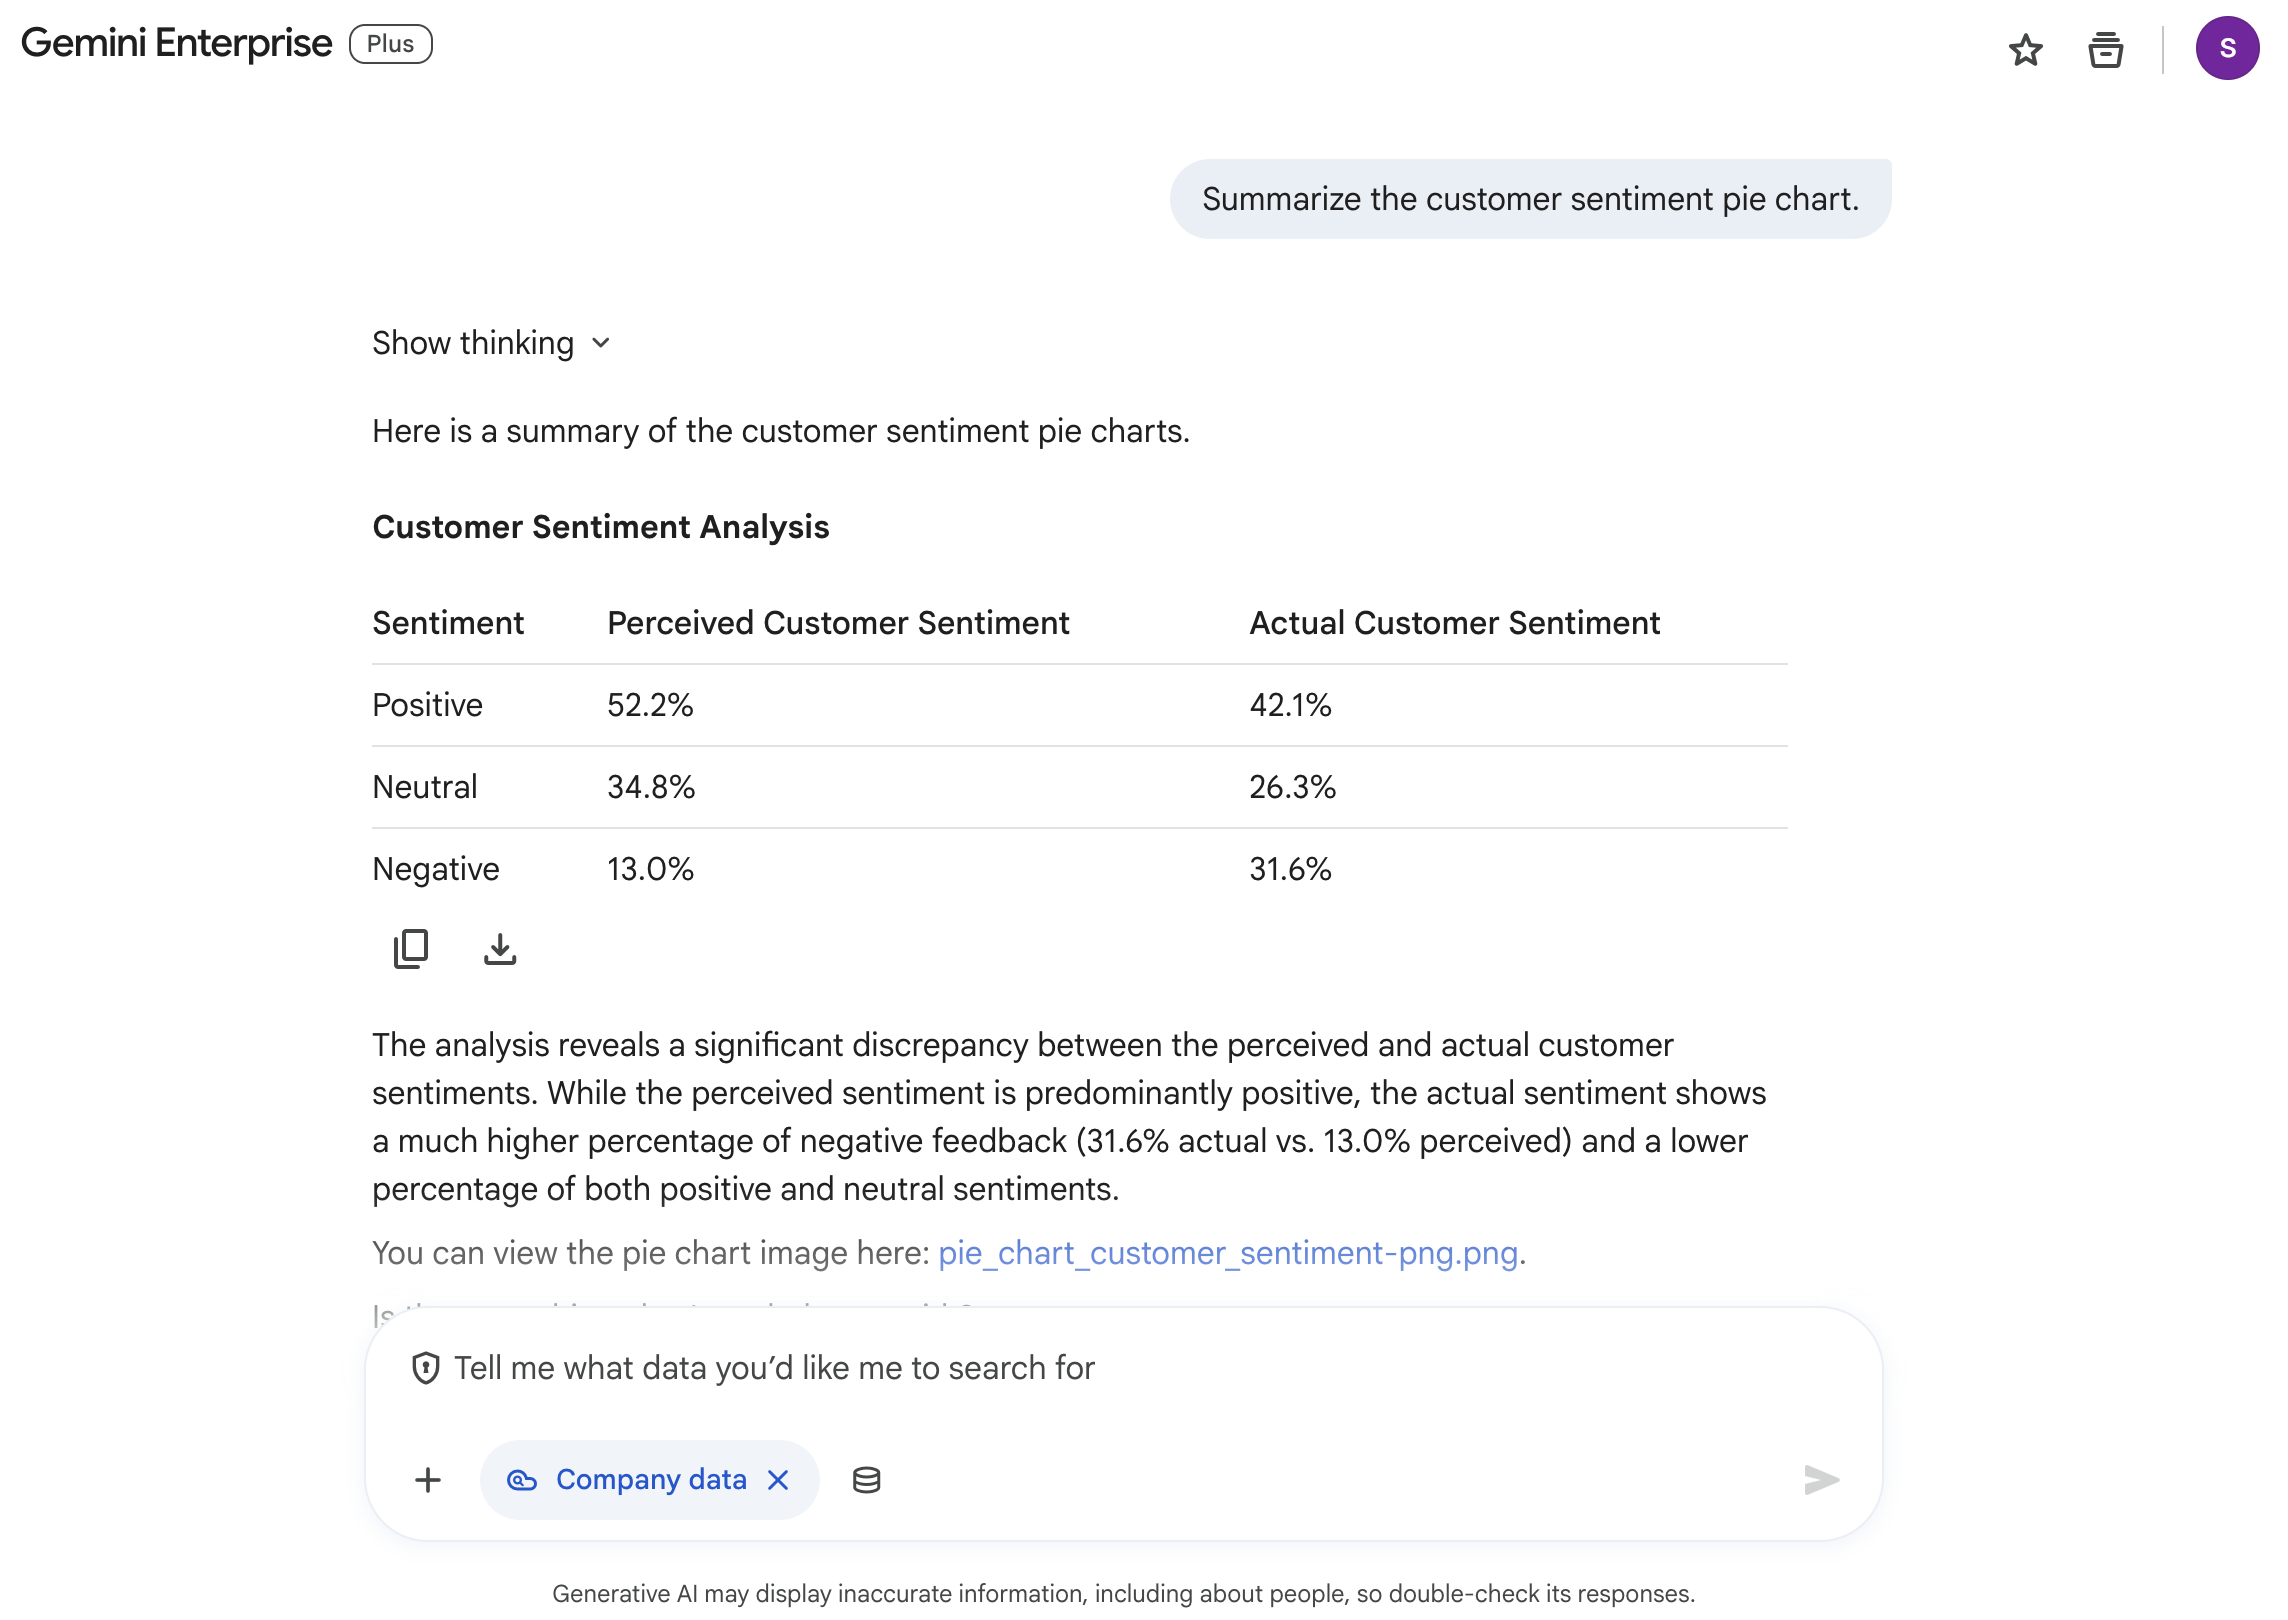
In the preview chat bar, enter:
Inspect the generated analysis.
At the top right of the canvas, click Create to publish your custom agent to your workspace.
Click the Google Gemini Enterprise (or Cymbal Foods) logo to return to the home screen.
In the left-hand navigation panel, click Agents.
Verify that your published Sales Assistant agent is listed under Your agents.
Click Check my progress to verify the objective.
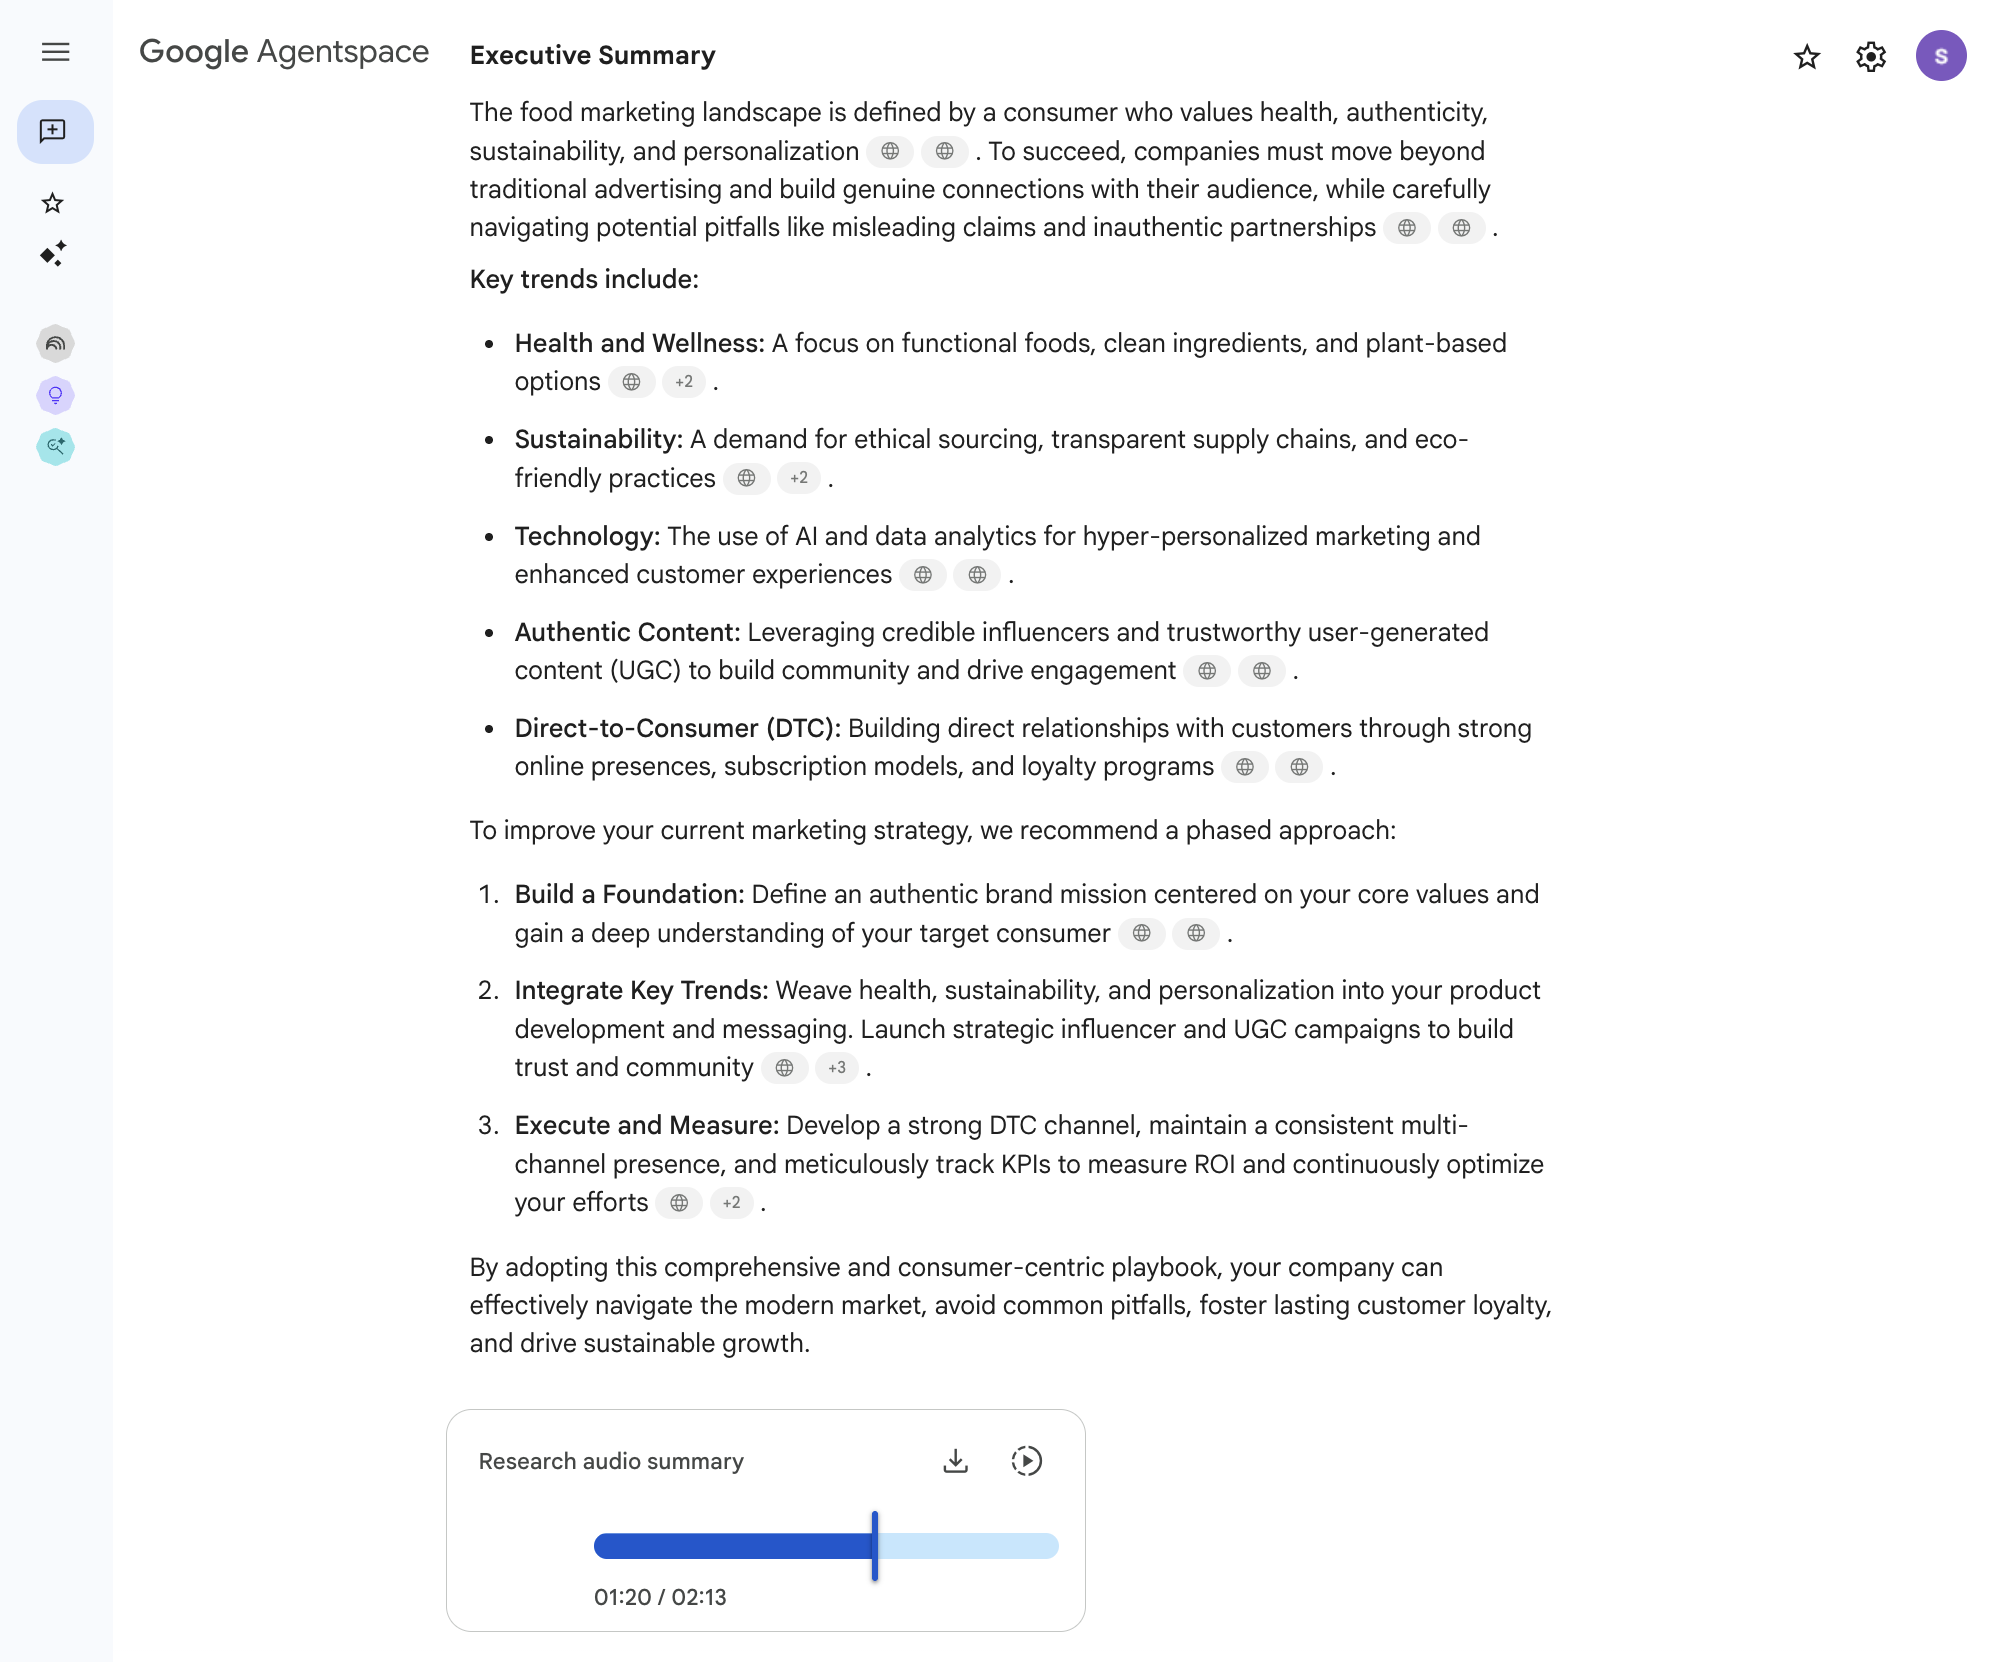
In this section, you will use the Deep Research agent to unlock deep insights with AI-driven research, reports, and audio summaries.
Click the Google Gemini Enterprise (or Cymbal Foods) logo to return to the homepage.
On the left-hand navigation menu, select Deep Research.
Enter the following prompt:
The agent will come up with a research plan for you.
This will take a few minutes to complete. You can choose to wait or continue on with the tasks in the lab, and come back to it later to check on the status of the generated report. After 5-10 minutes, your research report will be completed, and you will see the following summary and audio overview!
In the previous tasks, you explored Gemini Enterprise as a comprehensive platform for accessing enterprise information and utilizing specialized AI agents. Now, you'll delve into NotebookLM, a tool designed for focused research, deep analysis, and sense-making with specific collections of documents. NotebookLM acts as your personal research assistant, allowing you to upload your chosen sources and then ask detailed questions, generate summaries, and synthesize information, with all AI responses grounded directly in the materials you provide.
For Cymbal Foods, an employee might use NotebookLM to conduct an in-depth review of specific sales reports alongside customer feedback trends before drafting a new product proposal or marketing strategy. In this task, you will create a new notebook, add text versions of your Cymbal Foods data files as sources, and interact with NotebookLM to gain insights from this curated collection.
On the home page of your Cymbal Foods Gemini Enterprise app, click NotebookLM on the left-hand navigation pane.
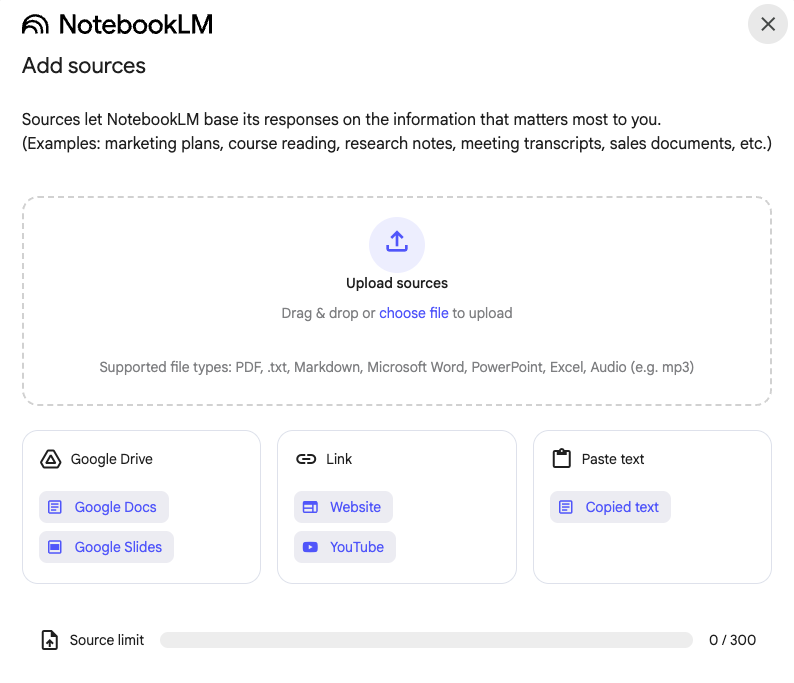
On the NotebookLM home page, click Create New Notebook at the bottom to start your focused analysis project.
The Add sources dialog will now appear, allowing you to select the documents NotebookLM will use for its analysis. It should look similar to the image below:
.txt files (that you downloaded in Task 1)
SALES_data.txtcustomer_feedback.txtMARKETING_data.txt.Your NotebookLM interface should resemble the following:
With your Cymbal Foods data loaded into the notebook, you can now ask targeted questions and explore the content.
Take a moment to observe the NotebookLM interface. You'll typically see your added sources listed (often on the left side of the screen), a central area for the chat section, and a Studio section for your notes and the Audio Overview.
Ask Grounded Questions to NotebookLM: In the chat input bar, type your questions. NotebookLM will generate answers based only on the content of the documents you've uploaded into this specific notebook. Try the following prompts:
Notice how NotebookLM formulates its answers. It should be evident that the information is drawn directly from your uploaded text files. Many grounded AI tools, including NotebookLM, will provide citations or highlight the source text used to generate an answer. Look for these, as they help you verify the information and easily refer back to the original context in your documents. NotebookLM is designed for iterative exploration. You can ask follow-up questions to dive deeper into specific points.
It's different from the broader Gemini Enterprise search (which queries across all connected data) or the specialized Data Analyst Agent (which operates based on its specific programmed instructions). NotebookLM offers a flexible environment for any collection of sources you want to study closely.
A key feature of NotebookLM is often the ability to save AI responses, key passages from sources, or your own thoughts as "notes" within the notebook. This helps you build a structured understanding and gather material for reports or further work. (You can briefly explore if you see options like "Add to notes" or a dedicated notes panel).
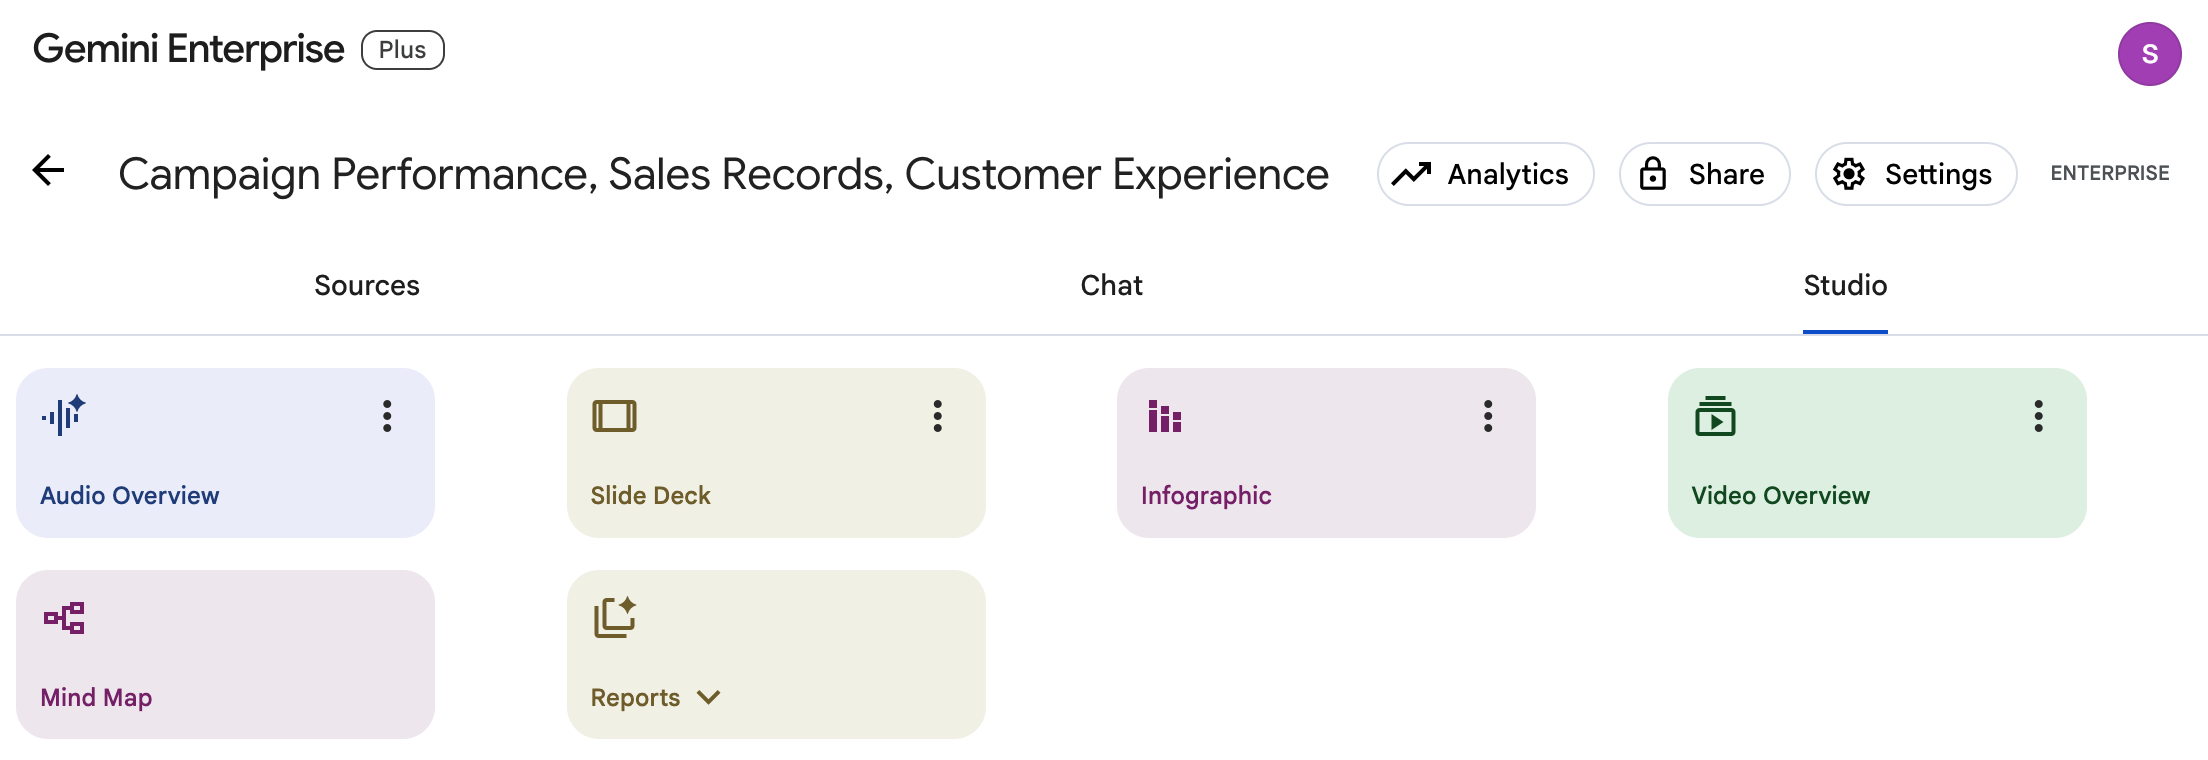
Beyond textual summaries and Q&A, NotebookLM offers innovative ways to synthesize information from your sources through Studio features like Audio Overview, Infographic, and Slide Deck. This allows you to generate spoken summaries, visual data sheets, and presentation decks derived from the documents you added to your notebook.
Click Check my progress to verify the objective.
You've now covered the core exercises for NotebookLM and Gemini Enterprise in this lab! If you have remaining time, this is an excellent opportunity to delve deeper and experiment further with both tools:
In NotebookLM:
In Your Gemini Enterprise App:
+ New Agent) to build additional custom agents. Try adjusting system instructions, attaching specific data connectors, or prompting the copilot to build multi-step workflow logic.This self-directed exploration is a great way to solidify what you've learned and discover even more potential uses for these powerful AI tools in managing and understanding enterprise information.
Congratulations! You've successfully deployed and explored Google Gemini Enterprise. Throughout this lab, you've configured data stores, interacted with different agents for search and summarization, and performed focused document analysis with NotebookLM, even generating multimodal overviews. These hands-on skills are invaluable for leveraging Google's advanced AI to unlock enterprise knowledge and streamline decision-making.
For more information about Gemini Enterprise, see the following pages:
Manual Last Updated June 26, 2026
Lab Last Tested June 26, 2026
Copyright 2026 Google LLC. All rights reserved. Google and the Google logo are trademarks of Google LLC. All other company and product names may be trademarks of the respective companies with which they are associated.


This content is not currently available
We will notify you via email when it becomes available

Great!
We will contact you via email if it becomes available

One lab at a time
Confirm to end all existing labs and start this one
Complete this quick step to start your lab.