

准备工作
- 实验会创建一个 Google Cloud 项目和一些资源,供您使用限定的一段时间
- 实验有时间限制,并且没有暂停功能。如果您中途结束实验,则必须重新开始。
- 在屏幕左上角,点击开始实验即可开始
Start a Kubernetes Engine cluster
/ 5
Run and deploy a container
/ 5

As a cloud architect, your designs for multi-tier architectures include the compute layer. In general, you deploy containers to satisfy your organization's computational needs. Some of your considerations as you complete your designs include the following:
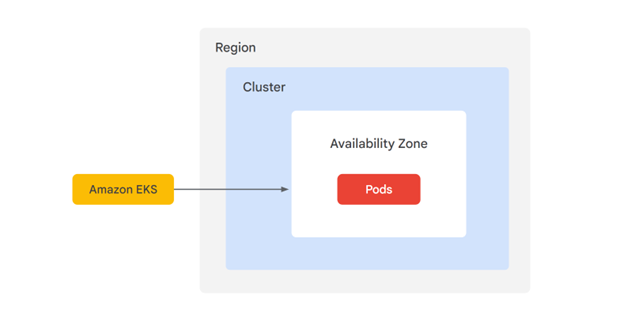
In Amazon Web Services (AWS), you deploy containers through Amazon Elastic Kubernetes Service (EKS). Through Kubernetes, EKS manages the availability and scalability of your Kubernetes control plane nodes, which are responsible for scheduling containers, managing application availability, and storing cluster data. Your containerized architecture on AWS EKS looks like the following:
Now you will explore how to create a zonal Google Kubernetes Engine (GKE) cluster to allocate your containers.
In this lab, you create a Google Kubernetes Engine cluster containing several containers, each containing a web server. You place a load balancer in front of the cluster and view its contents.
In this lab, you learn how to perform the following tasks:
kubectl.For each lab, you get a new Google Cloud project and set of resources for a fixed time at no cost.
Sign in to Google Skills using an incognito window.
Note the lab's access time (for example, 1:15:00), and make sure you can finish within that time.
There is no pause feature. You can restart if needed, but you have to start at the beginning.
When ready, click Start lab.
Note your lab credentials (Username and Password). You will use them to sign in to the Google Cloud Console.
Click Open Google Console.
Click Use another account and copy/paste credentials for this lab into the prompts. If you use other credentials, you'll receive errors or incur charges.
Accept the terms and skip the recovery resource page.
Make a note of the name of your Google Cloud project. This value is shown in the top bar of the Google Cloud Console. It will be of the form qwiklabs-gcp- followed by hexadecimal numbers.
In the Google Cloud Console, on the Navigation menu (
Scroll down in the list of enabled APIs, and confirm that both of these APIs are enabled:
If either API is missing, click Enable APIs and Services at the top. Search for the above APIs by name and enable each for your current project. (You noted the name of your GCP project above.)
In Google CLoud console, on the top right toolbar, click the Activate Cloud Shell button.
Click Continue.
For convenience, place the zone that Google Skills assigned to you into an environment variable called MY_ZONE. At the Cloud Shell prompt, type this partial command:
followed by the zone that Google Skills assigned to you. Your complete command will look similar to this:
Start a Kubernetes cluster managed by Kubernetes Engine. Name the cluster webfrontend and configure it to run 2 nodes:
It takes several minutes to create a cluster as Kubernetes Engine provisions virtual machines for you.
After the cluster is created, check your installed version of Kubernetes using the kubectl version command:
The gcloud container clusters create command automatically authenticated kubectl for you.
View your running nodes in the GCP Console. On the Navigation menu (
Your Kubernetes cluster is now ready for use.
Click Check my progress to verify the objective.
From your Cloud Shell prompt, launch a single instance of the nginx container. (Nginx is a popular web server.)
In Kubernetes, all containers run in pods. This use of the kubectl create command caused Kubernetes to create a deployment consisting of a single pod containing the nginx container. A Kubernetes deployment keeps a given number of pods up and running even in the event of failures among the nodes on which they run. In this command, you launched the default number of pods, which is 1.
View the pod running the nginx container:
Expose the nginx container to the Internet:
Kubernetes created a service and an external load balancer with a public IP address attached to it. The IP address remains the same for the life of the service. Any network traffic to that public IP address is routed to pods behind the service: in this case, the nginx pod.
View the new service:
You can use the displayed external IP address to test and contact the nginx container remotely.
It may take a few seconds before the External-IP field is populated for your service. This is normal. Just re-run the kubectl get services command every few seconds until the field is populated.
Open a new web browser tab and paste your cluster's external IP address into the address bar. The default home page of the Nginx browser is displayed.
Scale up the number of pods running on your service:
Scaling up a deployment is useful when you want to increase available resources for an application that is becoming more popular.
Confirm that Kubernetes has updated the number of pods:
Confirm that your external IP address has not changed:
Return to the web browser tab in which you viewed your cluster's external IP address. Refresh the page to confirm that the nginx web server is still responding.
Click Check my progress to verify the objective.
In this lab, you configured a Kubernetes cluster in Kubernetes Engine. You populated the cluster with several pods containing an application, exposed the application, and scaled the application.
Because Kubernetes is open source, this containerized environment has high portability and adaptability. Thus, deploying Kubernetes is similar across all platforms.
Here is a recap of the similarities and differences between these services:
Similarities:
Differences:
When you have completed your lab, click End Lab. Google Skills removes the resources you’ve used and cleans the account for you.
You will be given an opportunity to rate the lab experience. Select the applicable number of stars, type a comment, and then click Submit.
The number of stars indicates the following:
You can close the dialog box if you don't want to provide feedback.
For feedback, suggestions, or corrections, please use the Support tab.
Copyright 2026 Google LLC All rights reserved. Google and the Google logo are trademarks of Google LLC. All other company and product names may be trademarks of the respective companies with which they are associated.


此内容目前不可用
一旦可用,我们会通过电子邮件告知您

太好了!
一旦可用,我们会通过电子邮件告知您

一次一个实验
确认结束所有现有实验并开始此实验